Ticket Types
Ticket Types (also referred to as Templates) in Rezolve.ai form the foundation of your service management system. They define the structure, workflow, and behavior of tickets created in your organization. Each ticket type represents a specific service or request category and can be customized to capture relevant information, enforce appropriate processes, and ensure proper handling throughout the ticket lifecycle.
The Ticket Types Configuration provides administrators with powerful tools to design tailored service experiences that match their organization's specific needs, from simple IT requests to complex multi-stage processes that span multiple departments.
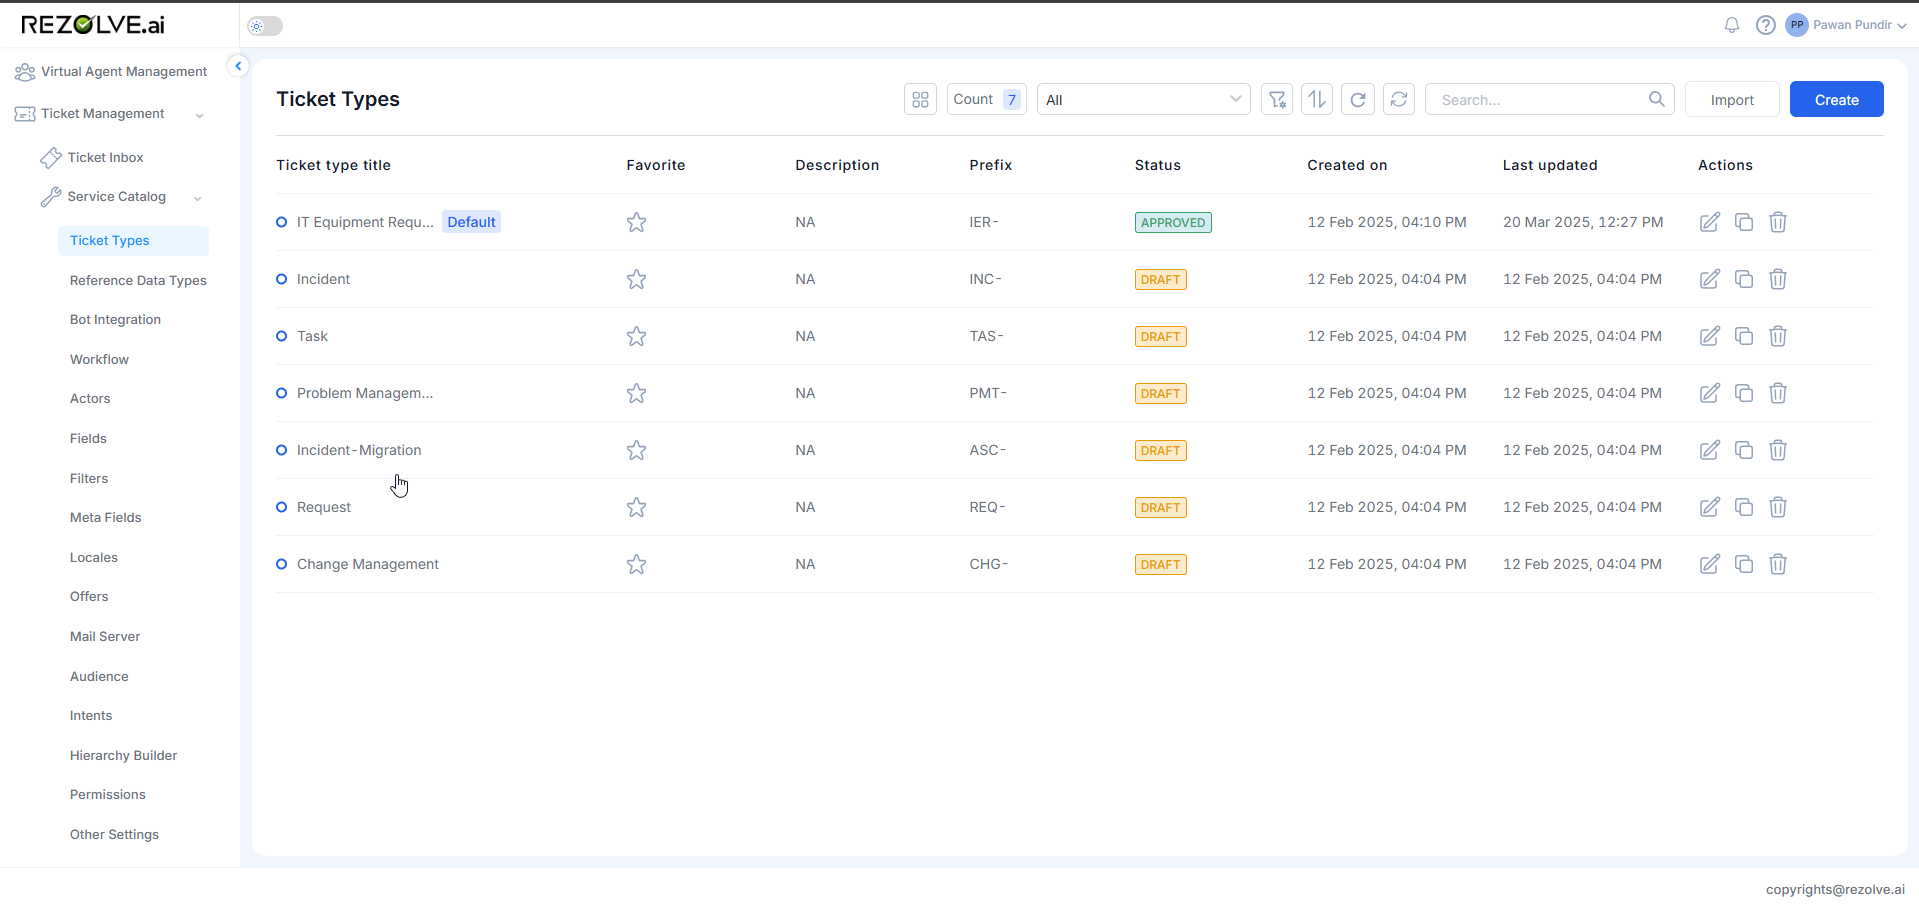
Accessing Ticket Types
To manage and configure ticket types:
- Navigate to the Service Catalog
- Select "Templates" or "Ticket Types" from the navigation menu
- You'll see a list of existing ticket types or can create a new one
Creating a New Ticket Type
To create a new ticket type:
- In the Ticket Types list, click "Create" or "Add New"
- Provide the initial configuration:
- Template Name: Descriptive name (e.g., "IT Support Request")
- Prefix: Identifier before ticket number (e.g., "IT")
- Number of Ticket Digits: Length of numeric portion (e.g., 5)
- Start At: Initial ticket number (e.g., 10001)
- Suffix: Identifier after ticket number (optional)
- Owners: Users who can approve the template
- Collaborators: Users who can edit and review the template
- Note Types: Types of notes allowed (Public, Private, Chase, Resolution)
- Channels: Where tickets can be created (Console, Bot, Email, etc.)
- Click "Create" to proceed to detailed configuration
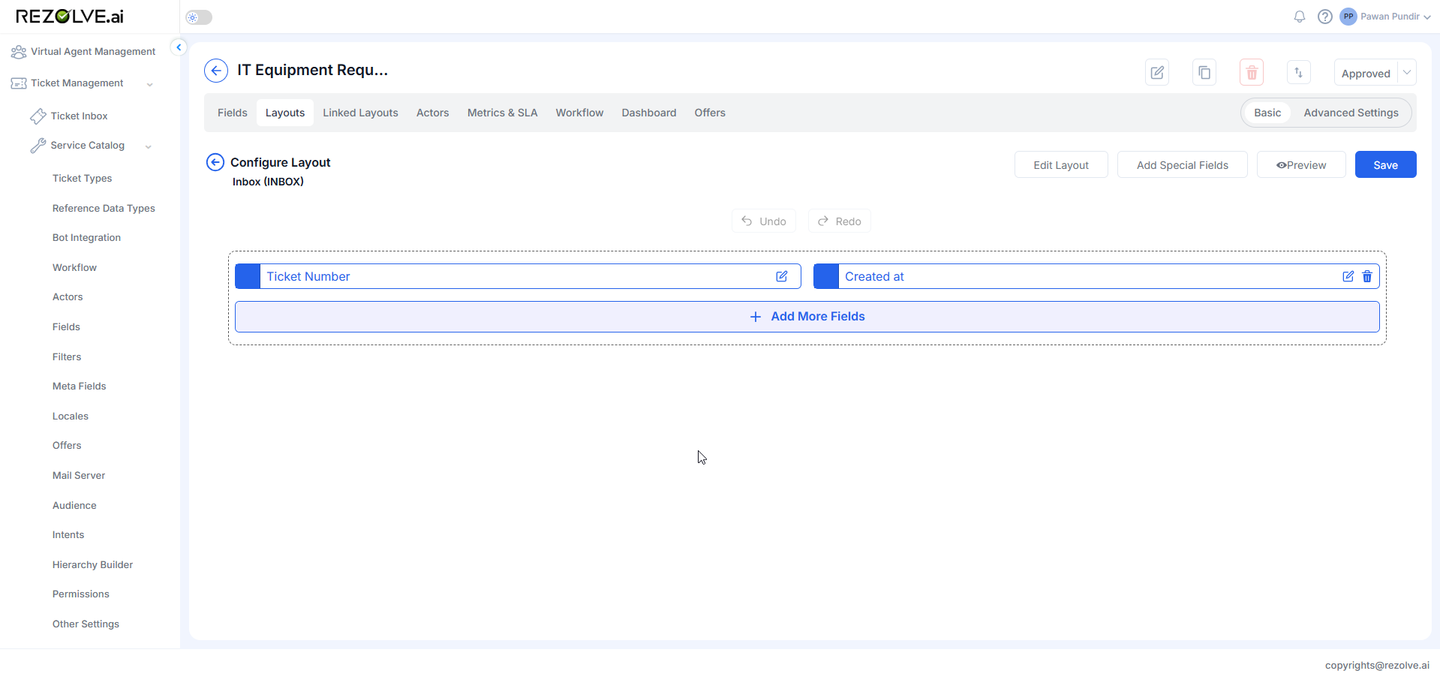
Configuring Layouts
Each ticket type requires three layout types that control how tickets appear in different contexts:
Create View
Defines the form users see when creating a new ticket:
- Navigate to the Create View layout
- Add sections and fields relevant to ticket creation
- Configure field layout, visibility, and requirements
- Save your layout
Detail View
Defines how a ticket appears when viewing its full details:
- Navigate to the Detail View layout
- Add all relevant fields, notes, history, and related information
- Organize content into logical sections
- Save your layout
Inbox View
Defines how tickets appear in the list/summary view:
- Navigate to the Inbox View layout
- Select fields that provide important at-a-glance information
- Arrange in order of importance
- Save your layout
After creating all three layouts, link them together in the "Linked Layouts" section.
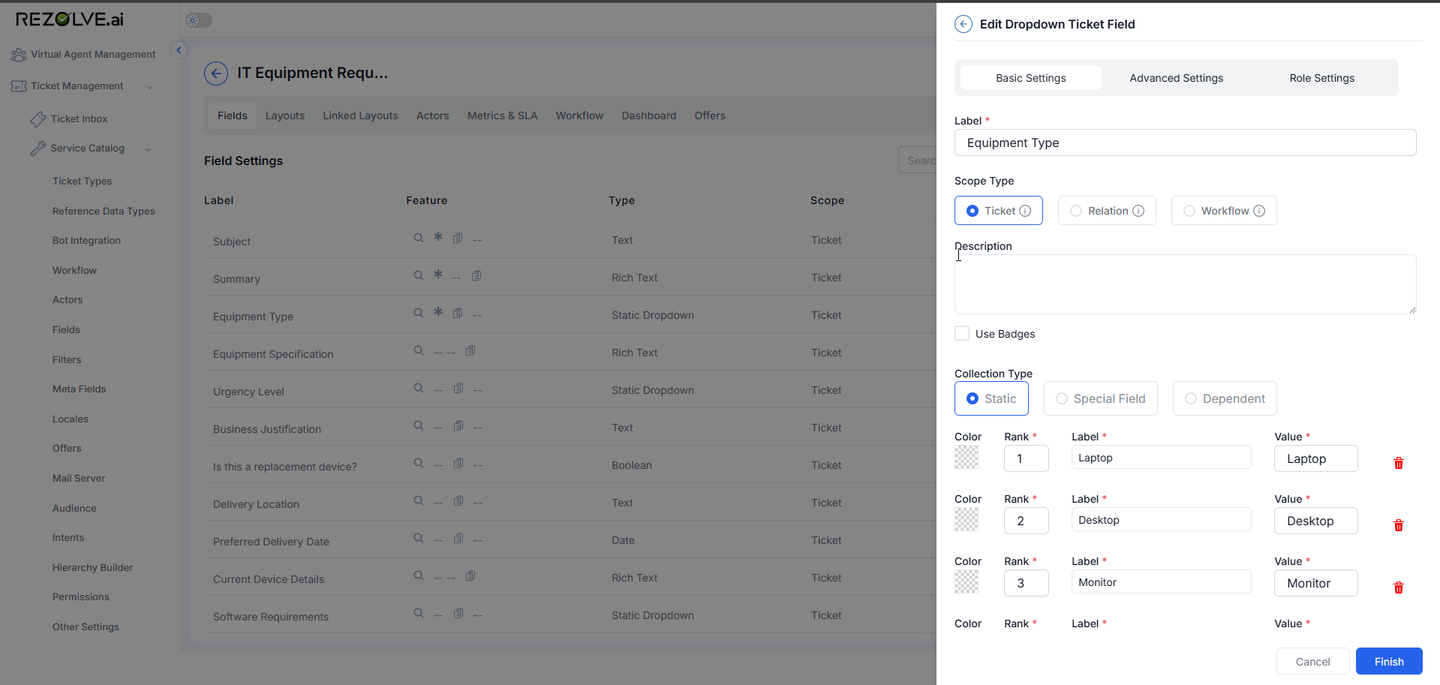
Field Management
Fields capture the specific information needed for each ticket type:
Adding Fields
- In the layout editor, click "Add Field" or the plus icon
- Select the field type:
- Text
- Number
- Dropdown
- Date
- Rich Text
- Media
- Boolean
- Configure the field properties:
- Name
- Description
- Default value
- Required status
Field Configuration Tabs
Each field has three configuration tabs:
- Basic Settings
- Field specifications
- Default values
- Description
- Attachment settings
- Advanced Settings
- Placeholder text
- Hint text
- Required toggle
- Searchable toggle
- Include in reports toggle
- Role Settings
- Viewers configuration
- Editors configuration
- Visibility conditions
- Editability conditions
- Requirement conditions
Special Fields
Special system-generated fields can be added via "Add Special Fields":
- Notes
- History
- Linked Tickets
- Watchers
- Submitted By
- Submitted On
- And many more
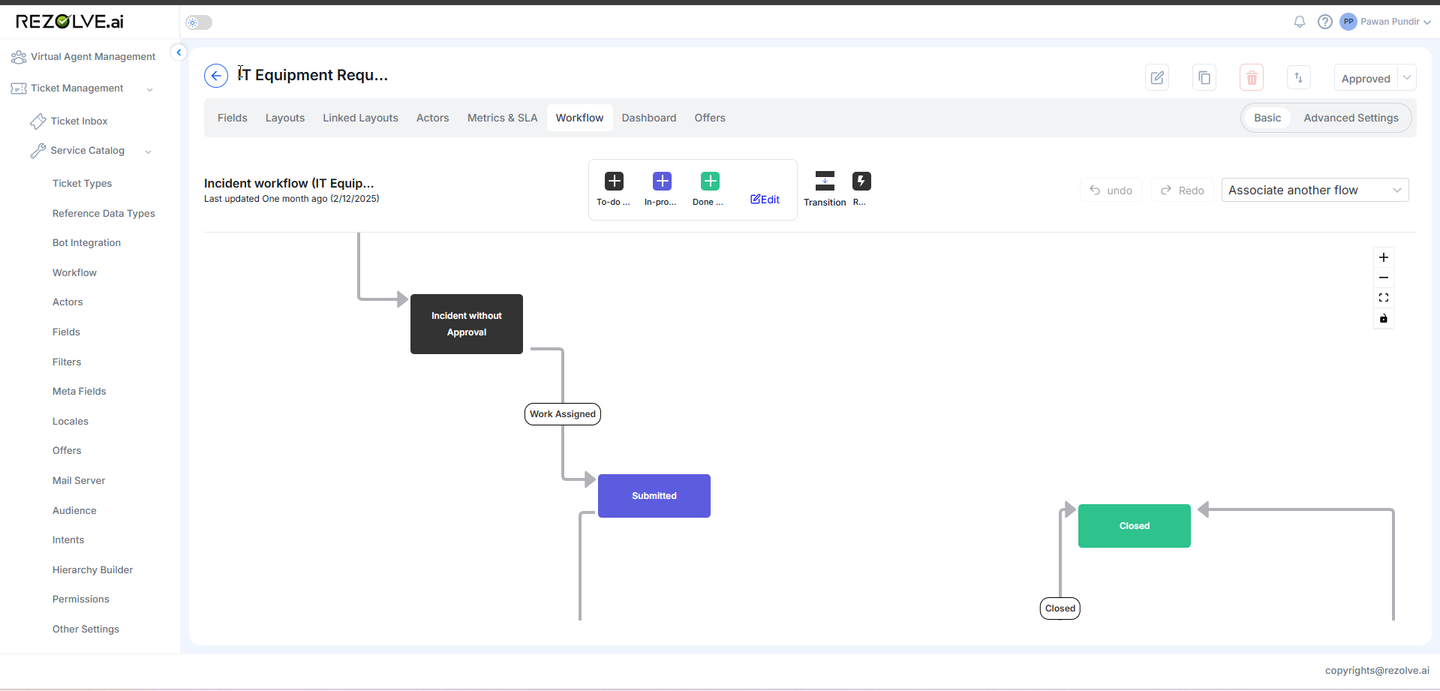
Workflow Configuration
Workflows define the states a ticket moves through during its lifecycle:
- Navigate to the Workflow section
- Select an existing workflow or create a new one
- If creating a new workflow:
- Add states (e.g., New, In Progress, Resolved, Closed)
- Organize states into categories (To-do, In-Progress, Done)
- Create transitions between states
- Define conditions and required fields for transitions
- Map the workflow states to your ticket type
Advanced Settings
Ticket types include numerous advanced configuration options accessible through tabs:
Events and Actions
Configure automated actions triggered by specific events:
- Create events (e.g., Field Update, Status Change, Note Added)
- Define actions to occur when events trigger:
- Send Email
- Update Fields
- Create Related Tickets
- Add Notes
- Change Assignments
Locales
Translate field names and other elements into multiple languages:
- German
- French
- Spanish
- Portuguese
- Japanese
- Chinese
Permissions
Control which roles can perform specific actions on tickets:
- Ticket Create/Update/Delete
- Status Transitions
- Note Management
- Assignment Changes
- Bulk Operations
Filters
Create predefined filters to help users quickly find relevant tickets:
- Based on any field values
- Using conditions (equals, contains, greater than, etc.)
- Combining multiple conditions with AND/OR logic
Templates
Create reusable content:
- Email Templates: For automated notifications
- Canned Notes: Predefined responses for common situations
Relations
Establish connections between different ticket types:
- Parent-child relationships
- Dependencies
- Custom relation types
- Field mapping between related tickets
Ticket Routing
Configure automatic assignment rules:
- Default team and queue
- Condition-based routing
- Priority rankings for rule evaluation
Map Hierarchy
Link organizational hierarchies to the ticket type:
- Connect to hierarchies created in Hierarchy Builder
- Configure which levels are included
- Define dependencies between levels
Quick Actions
Create one-click operations for common tasks:
- Add predefined notes
- Update fields
- Manage watchers and assignments
- Add attachments
Special Fields
Centrally manage system-generated fields:
- Configure visibility and permissions
- Select which fields to use for processes like Smart Summary
- Customize appearance and behavior
Template Approval Process
After configuring your ticket type, it must go through an approval process:
- Review all configurations
- Submit for approval
- Template owners review the submission
- The template is either approved or rejected with feedback
- Once approved, the template becomes available for use
Bot Integration
To make a ticket type available through the Virtual Agent:
- Ensure the template is approved
- Import the template to Bot Studio
- Configure NLP triggers and conversation flows
- Test the integration
- Deploy to production
Audience Configuration
Control who can access specific ticket types:
- Navigate to the offer page for your ticket type
- Assign appropriate audiences
- Only members of those audiences will be able to create tickets using this template
Default Ticket Type
For templates that meet specific criteria (approved and imported to Bot Studio), you can set one as the default:
- From the template list, hover over an eligible template
- Select "Set as Default"
- Confirm your choice
The default template serves as a fallback when the bot cannot determine which specific template to use based on a user's query.
Email Integration
To enable ticket creation via email:
- Configure a mail server in the Service Catalog
- Select which template to use for email-generated tickets
- Map email properties to ticket fields
- Configure processing rules
This creates a "silent offer" specifically for email-generated tickets.
Meta Field Configuration
To customize the list view of tickets across different templates:
- Create meta fields that map to fields in various templates
- Configure the table layout to show relevant information
- Use meta fields for filtering and reporting across template boundaries
Smart Summary Configuration
Enable AI-generated summaries of ticket activity:
- Navigate to Special Fields > Smart Summary
- Configure visibility settings
- Select which fields to include in summary generation
- Choose comprehensiveness level (Detailed, Balanced, Crisp)
- Select summarization style (Professional, Casual, Empathetic)
Best Practices for Ticket Type Configuration
- Start with User Needs: Design templates based on actual service requests
- Keep It Simple: Include only necessary fields to avoid overwhelming users
- Use Consistent Naming: Establish naming conventions across templates
- Consider the Full Lifecycle: Design for the entire process, not just creation
- Test Thoroughly: Verify all conditions and workflows before approval
- Document Your Design: Maintain explanations of complex configurations
- Review Periodically: Update templates as processes evolve
- Gather User Feedback: Continuously improve based on actual usage
Example: IT Support Request Template
Basic Configuration
- Name: IT Support Request
- Prefix: IT
- Digits: 5
- Start At: 10001
Key Fields
- Category (dropdown): Hardware, Software, Access, Network
- Priority (dropdown): Low, Medium, High, Critical
- Impact (dropdown): Individual, Team, Department, Organization
- Description (rich text): Detailed problem description
- Attempted Solutions (text): What the user has already tried
Workflow
New → Triage → Assigned → In Progress → Resolved → Closed
Optional paths for Pending and Escalated states
Routing Rules
- Hardware issues to IT Hardware team
- Software issues to IT Software team
- Critical priority to Urgent Support queue
- Default to General IT Support queue
Conclusion
Ticket Types Configuration in Rezolve.ai provides an exceptionally flexible and powerful way to design service experiences tailored to your organization's specific needs. By thoughtfully configuring layouts, fields, workflows, and advanced settings, you can create a service management system that captures the right information, follows appropriate processes, and delivers consistent, efficient service across your organization.
The comprehensive configuration options allow for everything from simple request forms to complex multi-stage processes with sophisticated automation, approvals, and integrations. As your organization's needs evolve, you can continuously refine and expand your ticket types to improve service delivery and user satisfaction.