Using Virtual Agent in SharePoint
Rezolve.ai's Virtual Agent can be seamlessly integrated into SharePoint environments through a custom SharePoint Framework (SPFx) web part. This integration brings the power of the AI-powered virtual agent directly into SharePoint sites where users frequently work, providing contextual support without requiring them to navigate to external systems.
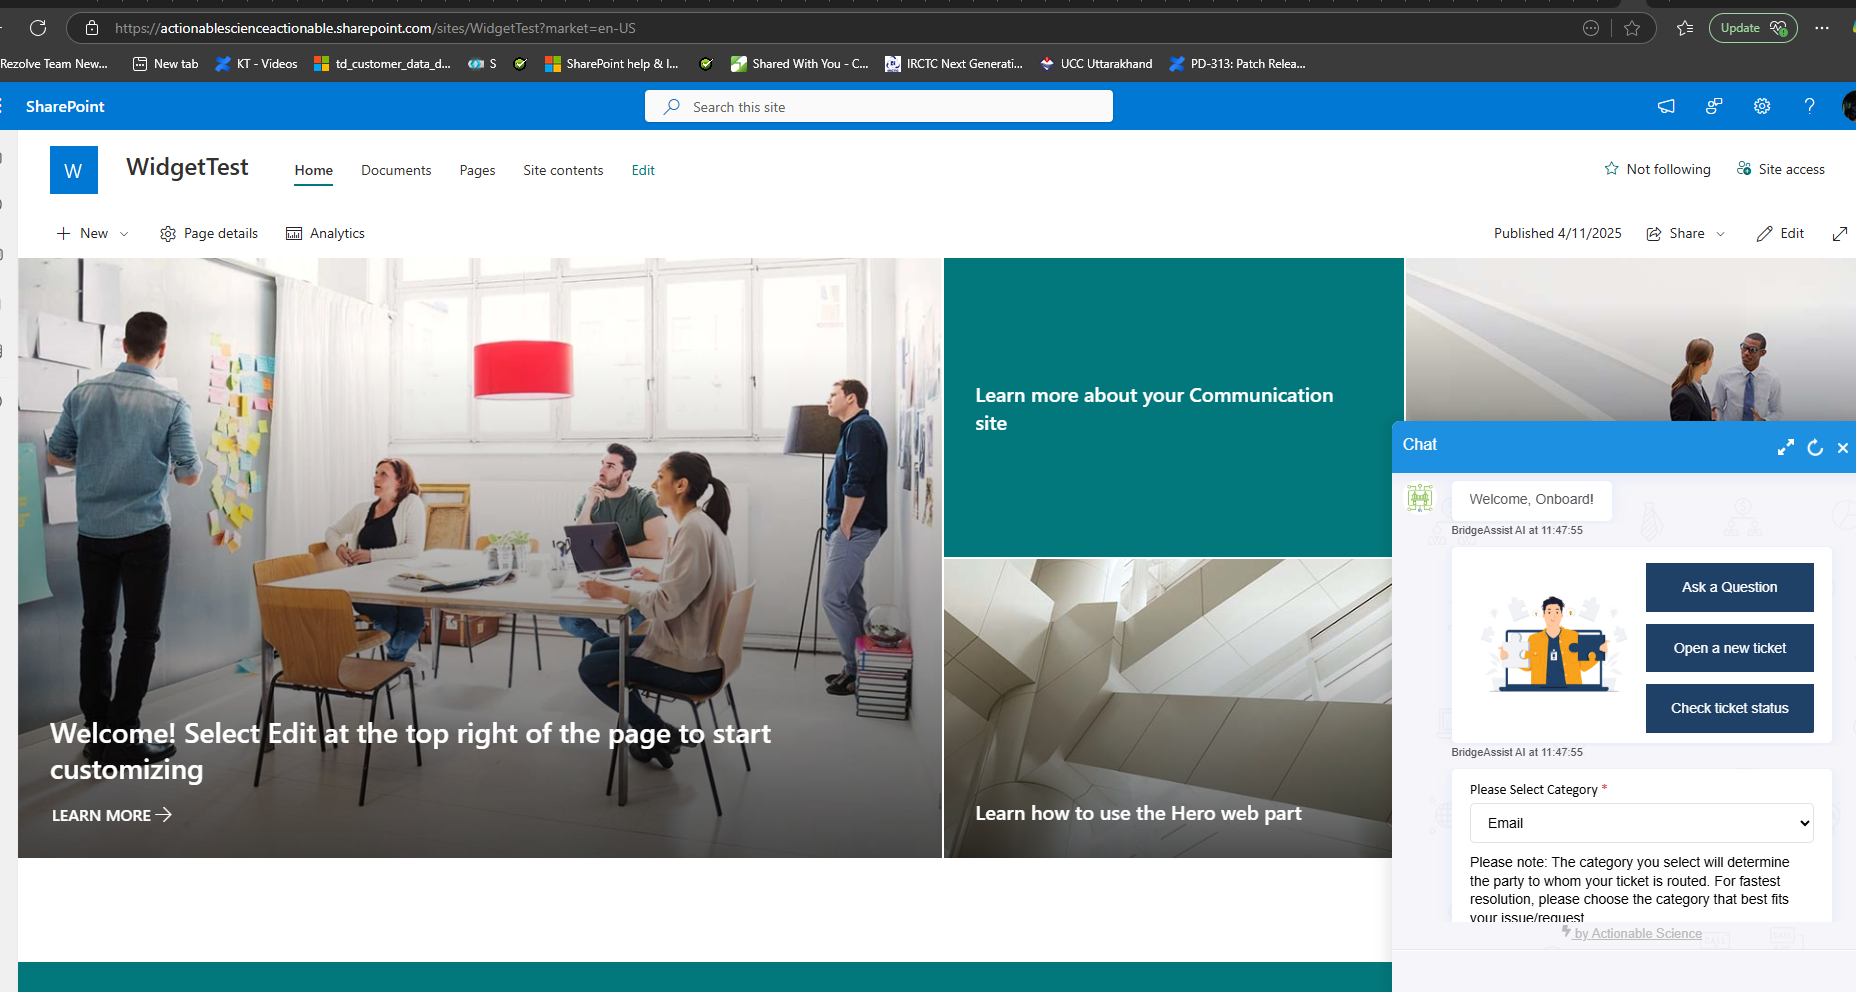
The SharePoint integration appears as a chat icon in the corner of SharePoint pages that expands into a full-featured bot interface when clicked. This implementation leverages SharePoint Framework (SPFx), Microsoft's modern development model for SharePoint customizations, ensuring secure, performant integration that follows best practices for SharePoint development.
Creating the SharePoint Package
For clients wishing to deploy the Virtual Agent in SharePoint, Rezolve.ai creates a custom SPFx package that the client's IT team can install through the SharePoint Admin Center. This package contains all necessary components for deploying the Virtual Agent web part while maintaining SharePoint's security and governance standards.
The deployment process follows Microsoft's recommended practices for SPFx solutions, ensuring compatibility and supportability. Once deployed, the web part can be added to any SharePoint page through the standard page editing experience, giving site owners flexibility in where and how the Virtual Agent appears.
The package supports both modern SharePoint Online environments and SharePoint Server 2019 or later, providing broad compatibility across different SharePoint deployments.
Step-by-Step Implementation Guide
Step 1: Set Up Your SPFx Project
The first stage of creating the SharePoint package involves setting up the development environment and initializing the SPFx project:
-
Install Node.js as a prerequisite for SharePoint Framework development
-
Install the required global tools using npm:
npm install -g yo gulp
npm install -g @microsoft/generator-sharepoint -
Create and navigate to a new directory for the project:
mkdir my-spfx-webpart
cd my-spfx-webpart -
Run the SharePoint Yeoman generator to scaffold the project:
yo @microsoft/sharepoint -
Configure the initial project settings:
- Solution Name: RezolveBot
- Component Type: WebPart
- Web Part Name: Rezolve-Sharepoint-BotApp
- Framework: No framework
This setup creates the basic structure required for the SharePoint web part, including configuration files, source code templates, and the build system.
Step 2: Modify the SPFx Web Part
After creating the project scaffold, you'll need to customize the web part to integrate the Rezolve.ai Virtual Agent:
-
Open the project in your preferred code editor
-
Navigate to the main web part TypeScript file in the src/webparts directory
-
Replace the default code with one of the provided implementation options:
- Option 1: Authentication on Load - Automatically authenticates the user when the page loads
- Option 2: Authentication on Click - Authenticates the user only when they click on the bot icon
The implementation includes:
- Custom styling to match the bot appearance to SharePoint themes
- Animation effects for the bot icon to increase visibility
- Event handlers for opening and closing the chat interface
- Integration with Rezolve.ai's widget JavaScript API
- User authentication handling appropriate for the SharePoint environment
The code manages the bot's lifecycle, ensuring proper initialization, authentication, and cleanup when navigating between SharePoint pages.
Step 3: Deploy Your SPFx Web Part
Once the web part code is customized, you'll need to build and package it for deployment:
-
Use the SPFx build tools to compile and bundle the solution:
gulp build -
Create a production-ready bundle:
gulp bundle --ship -
Package the solution for SharePoint deployment:
gulp package-solution --ship
This process creates a .sppkg file in the sharepoint/solution folder. This package file contains everything needed to deploy the Virtual Agent to SharePoint and is what you'll provide to the client's IT team for installation.
Installation in the Client Environment
After receiving the .sppkg file, the client's IT team follows these steps:
- Navigate to the SharePoint Admin Center
- Select the "Apps" section
- Click "App Catalog" (creating one if it doesn't exist)
- Upload the .sppkg file to the App Catalog
- When prompted, choose whether to make this solution available to all sites
- Trust the solution when prompted
Once deployed to the App Catalog, site owners can add the Virtual Agent to any SharePoint page:
- Edit the page where the Virtual Agent should appear
- Click the "+" button to add a web part
- Find and select the "Rezolve-Sharepoint-BotApp" web part
- Position and save the page
Benefits of SharePoint Integration
The SharePoint integration of Rezolve.ai's Virtual Agent offers several unique advantages:
- Contextual Support: Provides assistance directly within the SharePoint environment where users are working
- Seamless Experience: Maintains SharePoint's look and feel while adding powerful support capabilities
- Reduced Context Switching: Users don't need to leave SharePoint to get help or create support tickets
- Centralized Deployment: IT can manage deployment across the organization through familiar SharePoint administration tools
- Security Compliance: Follows SharePoint's security model and authentication methods
- Easy Adoption: Appears within existing work environments, increasing visibility and usage
This integration is particularly valuable for organizations with significant investments in SharePoint as a knowledge management and collaboration platform, as it brings support capabilities directly into these established workflows rather than requiring users to adopt separate systems for getting assistance.