Virtual Agent Mgmt with Doc Ingestion Guide NEW
Virtual Agent Mgmt Guide
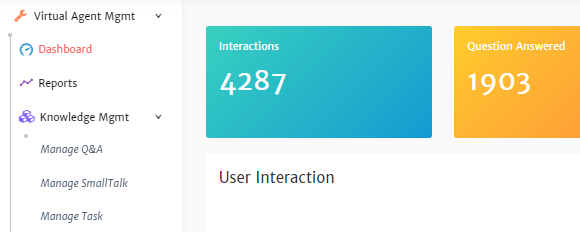
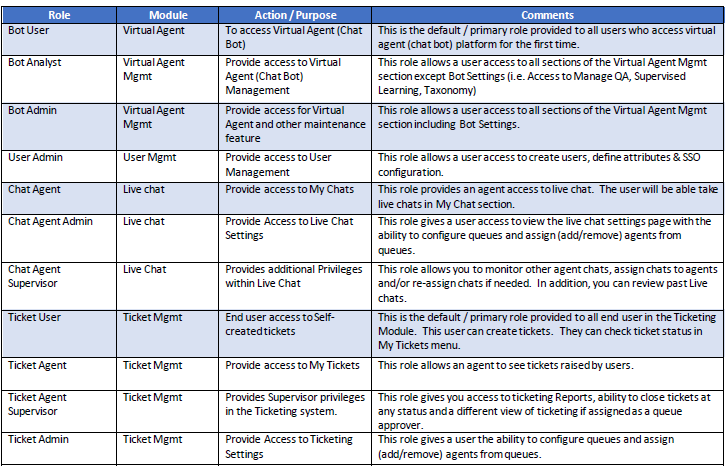
GETTING STARTED Welcome to your Admin Portal!!! In this manual, we will take a quick look at the various Admin task an Admin will have to complete. Navigation Pane The Navigation menu can be always be found on the left side of your screen except when using the Virtual Agent section. What you are able to see in the navigation pane depends on what roles you have been given in the Admin Portal.
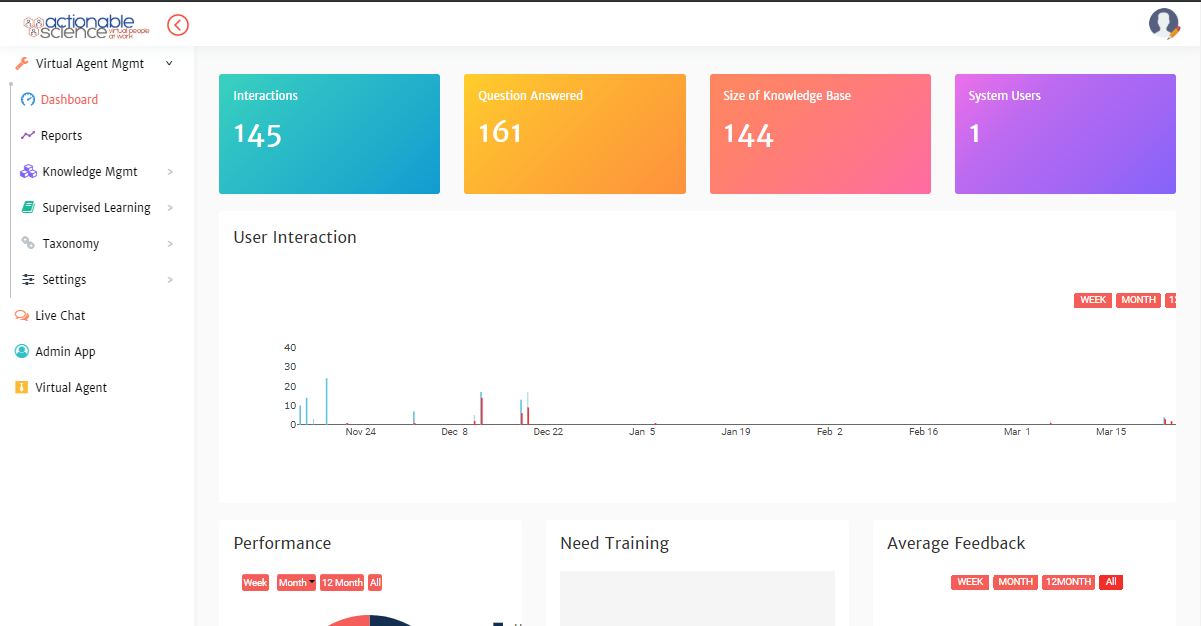
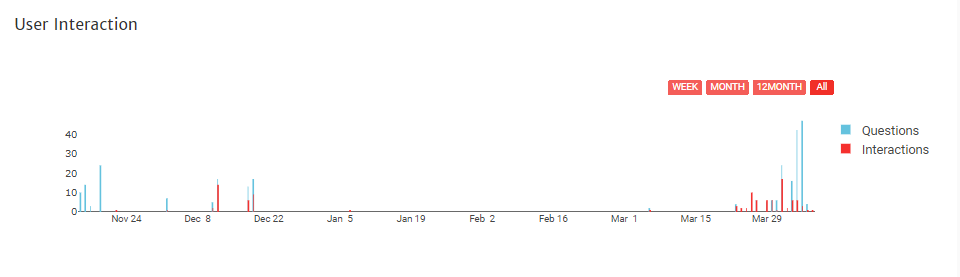
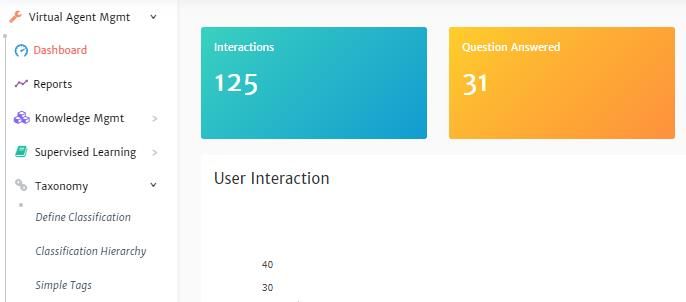
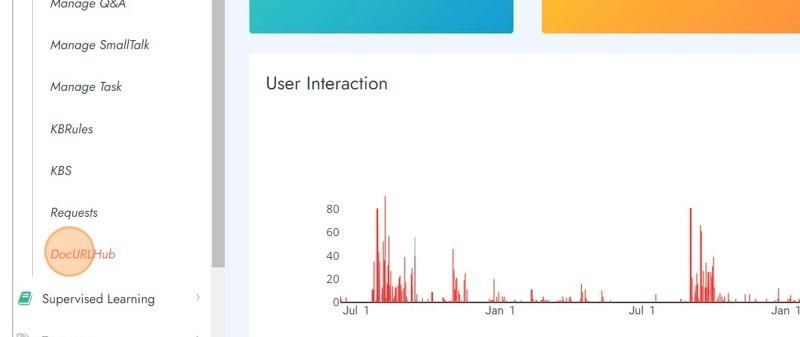
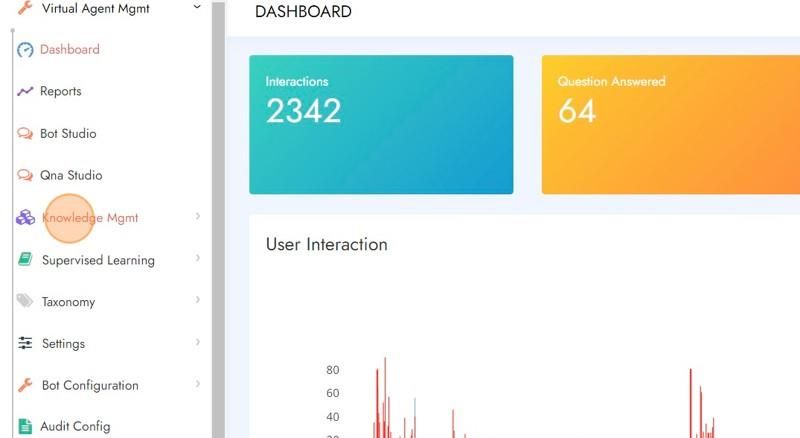
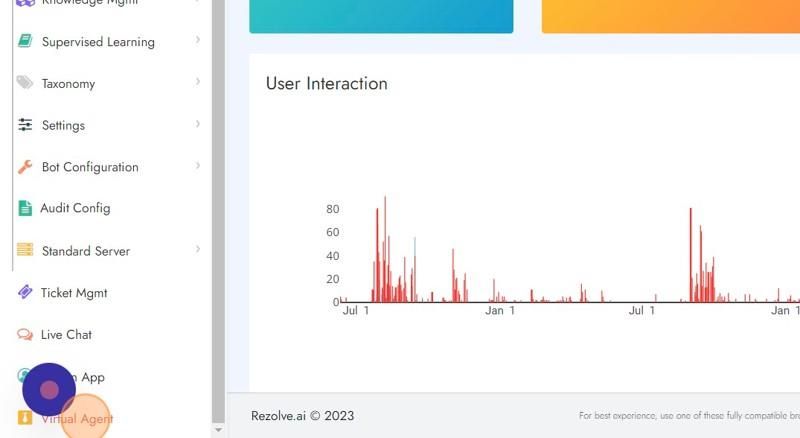
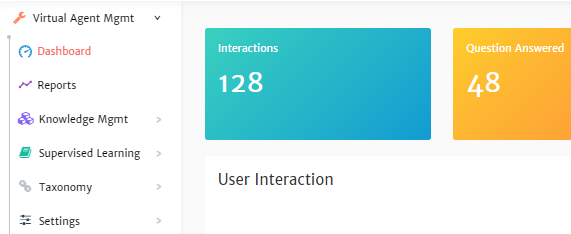
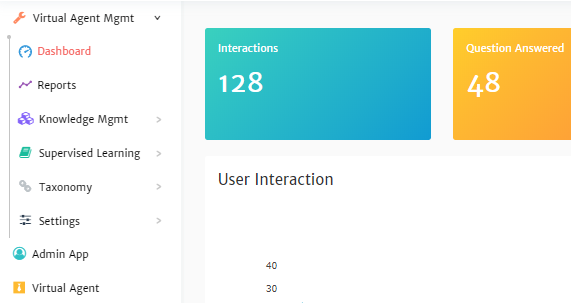
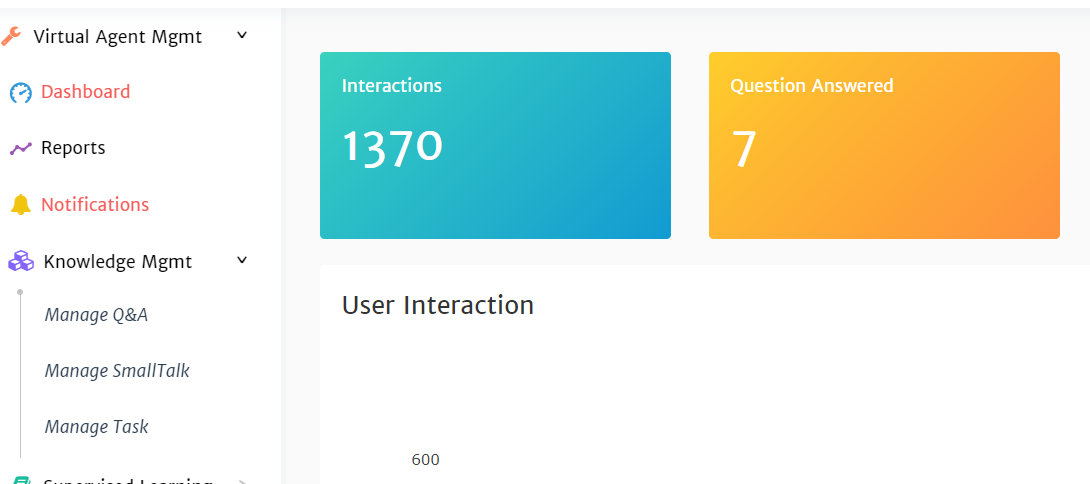
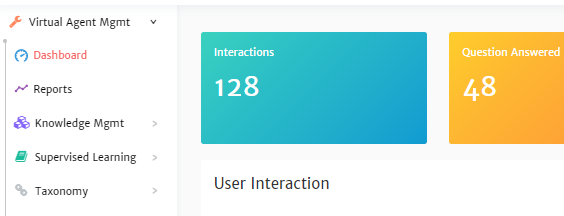
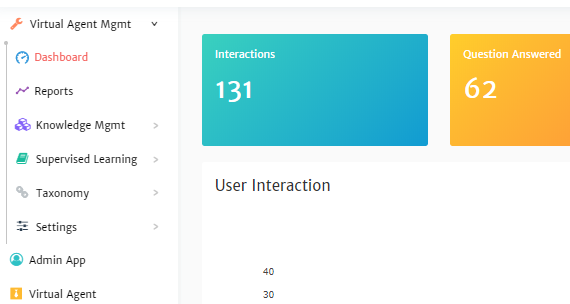
Dashboard On the Dashboard, you can find some basic information on the bot performance. The top section of the four boxes covers: • Interactions - gives you an overview of the number of chats with the bot • Question Answered - questions the bot answered • Size of Knowledge Base - how many dialogues the bot is trained on • System Users - number of users who have accounts to access the bot in the portal In the next section, the table looks at the number of chats and how many questions the bot has been asked by date. We differentiate the two since in one chat a user can ask multiple questions.
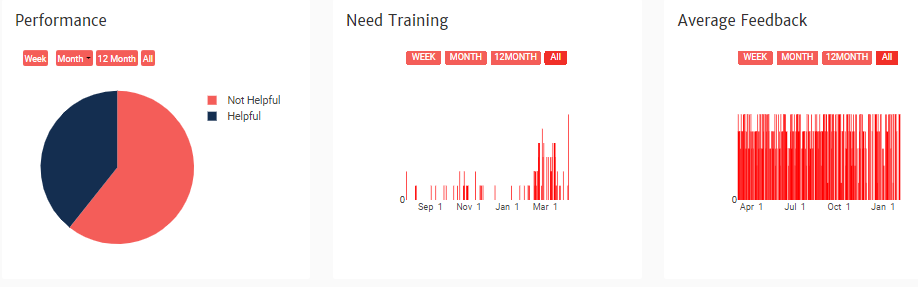
You can filter the view by: • Week • Month • 12 Month • All Simply click on the filter you would like to apply. In the next section, a pie graph and multiple tables. The Performance pie graph shows you how many chats the user said the answer was helpful or not helpful by date. The Need Training bar graph looks at the questions that the bot was unable to answer that it hasn’t been trained on yet by date. The Average Feedback bar graph looks at the feedback rating. At the end of a chat, the user may submit overall feedback with a star rating and comments. This graph looks at the star rating by date.
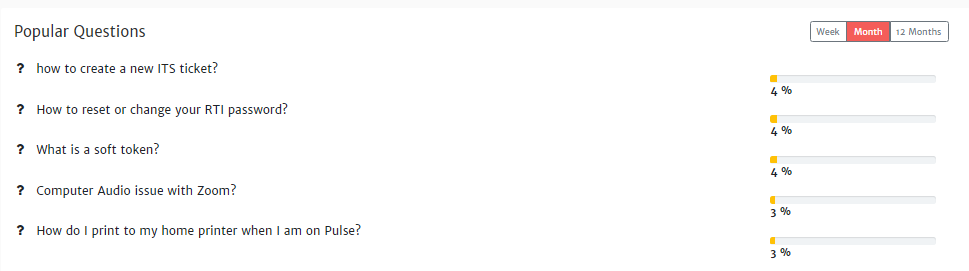
You can filter the view of each by: • Week • Month • 12 Month • All Simply click on the filter you would like to apply. The final section looks at the top 5 questions asked to the bot. You can filter the view of each by:
• Week • Month • 12 Month • All Simply click on the filter you would like to apply.
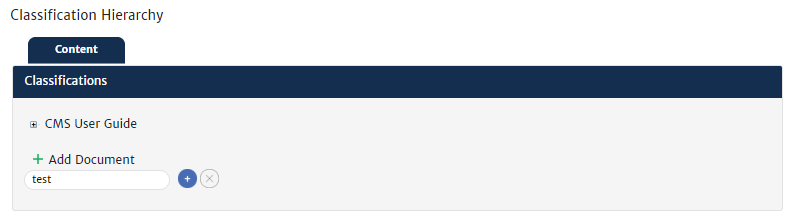
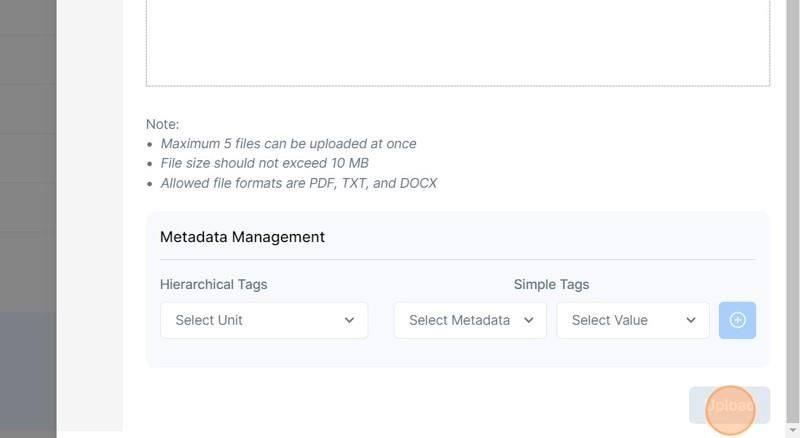
CATEGORIZE THE KNOWLEDGE BASE To enable the ability to categorize articles/questions into logical groups that can later be used as an easy search, you will need to define and create these groups or tags in the Taxonomy section. In this section, you can create groups based on hierarchy and category. There are two types of tags in this section, Hierarchal tags and Simple tags. Hierarchy Tags Hierarchy tags are used to define and categorize the bulk of a knowledge base. Managing Classifications Once classifications have been defined, you can start building out your classification hierarchy by adding tags to each level. Add Hierarchy tags
- Click Taxonomy in the navigation pane on the left of your console
- Click Classification Hierarchy in the navigation pane on the left of your console
- You will see a green + next to Add (Lable name of Level 1), click the green +
- Type in the name of the Level 1 tag
- Click the + sign to add your tag NOTE: If you click the X instead this will cancel the added category
- This category will now show in the list. You will repeat the above steps to create any additional Level 1 tags.
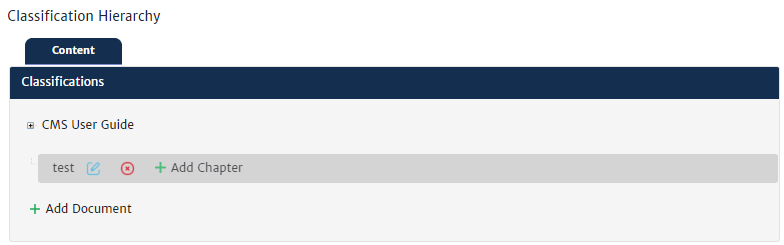
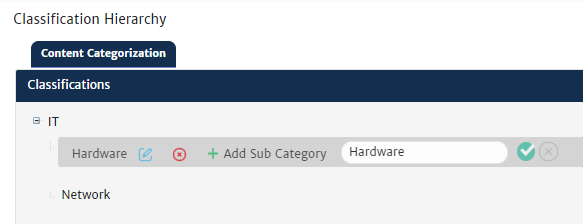
• If you have created multiple levels you will see a green + next to Add (Lable Name of Level 2). Click the green + to add your sub-tag. • If you would like to add multiple sub-categories, make sure the section you want to add it to is highlighted and click the green + next to Add (Level Lable). • Do this for all sub-levels. Modifying a Hierarchial tag Important Note: The tag you would like to edit, most be removed from all dialogues before editing or removing it.
- Click Taxonomy in the navigation pane on the left of your console
- Click Classification Hierarchy in the navigation pane on the left of your console
- Highlight the tag you would like to edit
- Click the pencil icon next to it
- Make your changes
- Click the checkmark next to the edit area to save The system will start applying the change when complete you will see a Successful message.
Delete a Hierarchical tag Important Note: The tag you would like to delete, most be removed from all dialogues before removing it.
- Click Taxonomy in the navigation pane on the left of your console
- Click Classification Hierarchy in the navigation pane on the left of your console
- Highlight the tag you would like to remove
- Click the X next to it
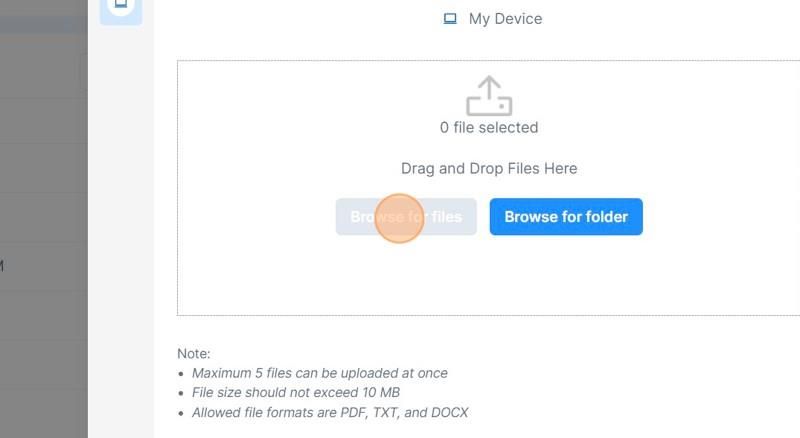
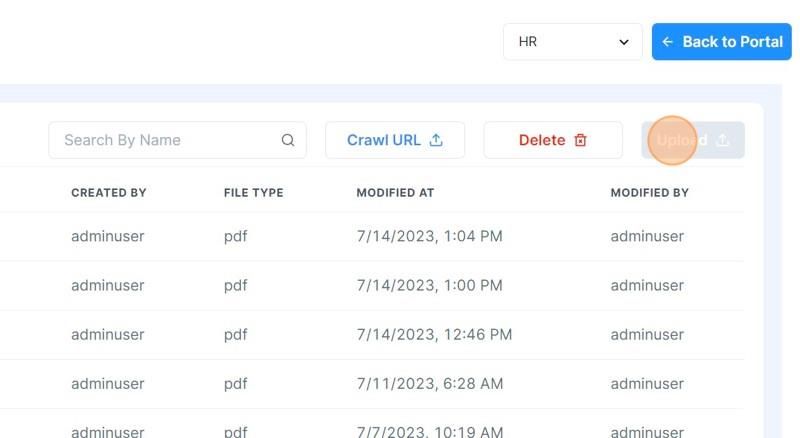
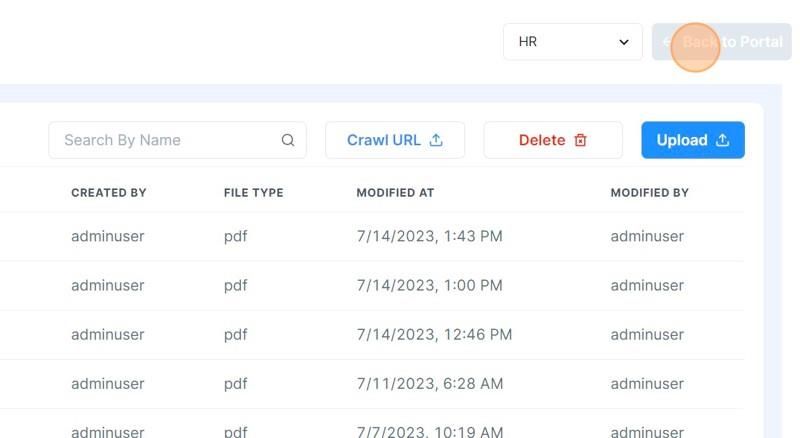
VIRTUAL AGENT MANAGEMENT This is the section used to maintain the Virtual Assistant. Knowledge Mgmt In this section, you will create and maintain how your Virtual Assistant’s responds to end-user questions. Document Ingestion For knowledge responses to come from documentation, we will be using the DocURLHub menu option. Note: To use websites as your knowledge source please speak to your CSM. Document Upload Conditions • Maximum 5 files can be uploaded at once • File size should not exceed 10 MB • Allowed file formats are PDF, TXT, and DOCX Uploading a Document to your Rezolve Admin (Agent) Console
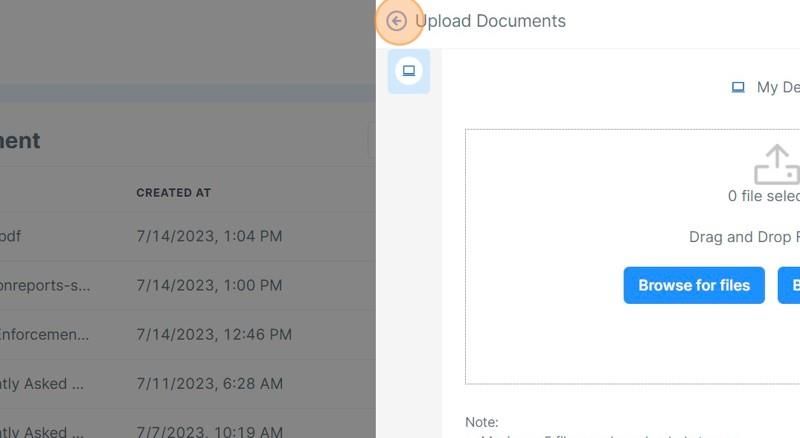
3 Click "DocURLHub"
4 Click "Upload" 5 Click "Browse for files"
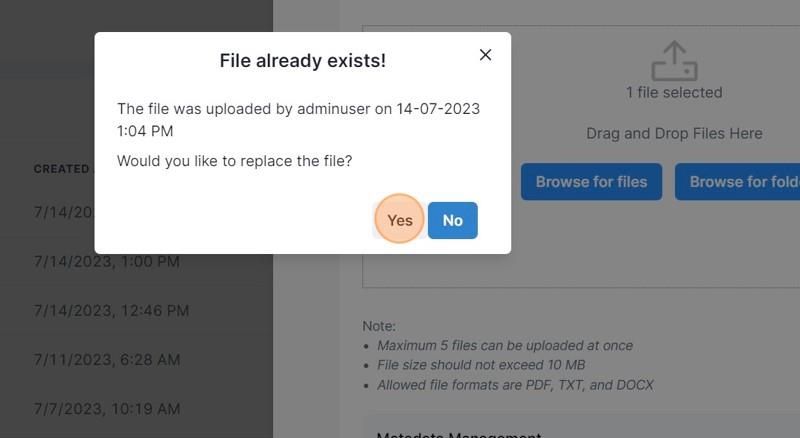
6 Click "Upload" 7 If the document already exists you will get the following prompt and need to click "Yes". Otherwise, proceed to the next step. 8 After you received a successfully uploaded message, click the back icon (found next to "Upload Documents".
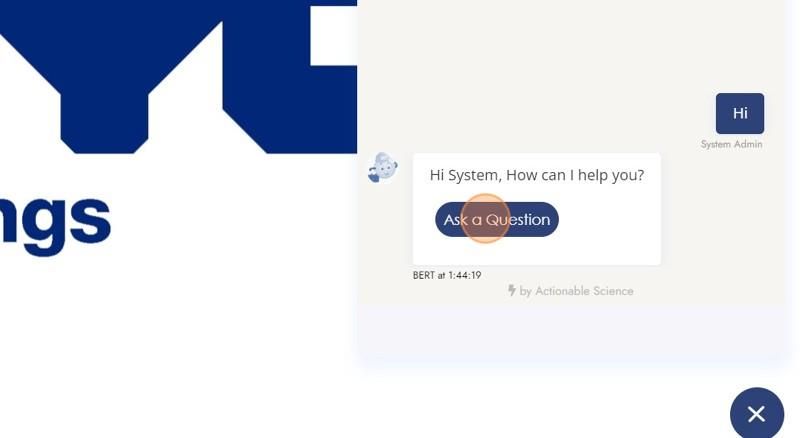
9 To test your new document uploaded, click "Back to Portal"
10 Click "Virtual Agent" 11 Click "Click To Begin" 12 Click "Ask a Question" and ask something that would get answered from the document you uploaded.
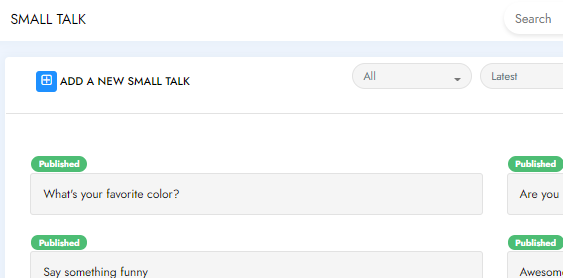
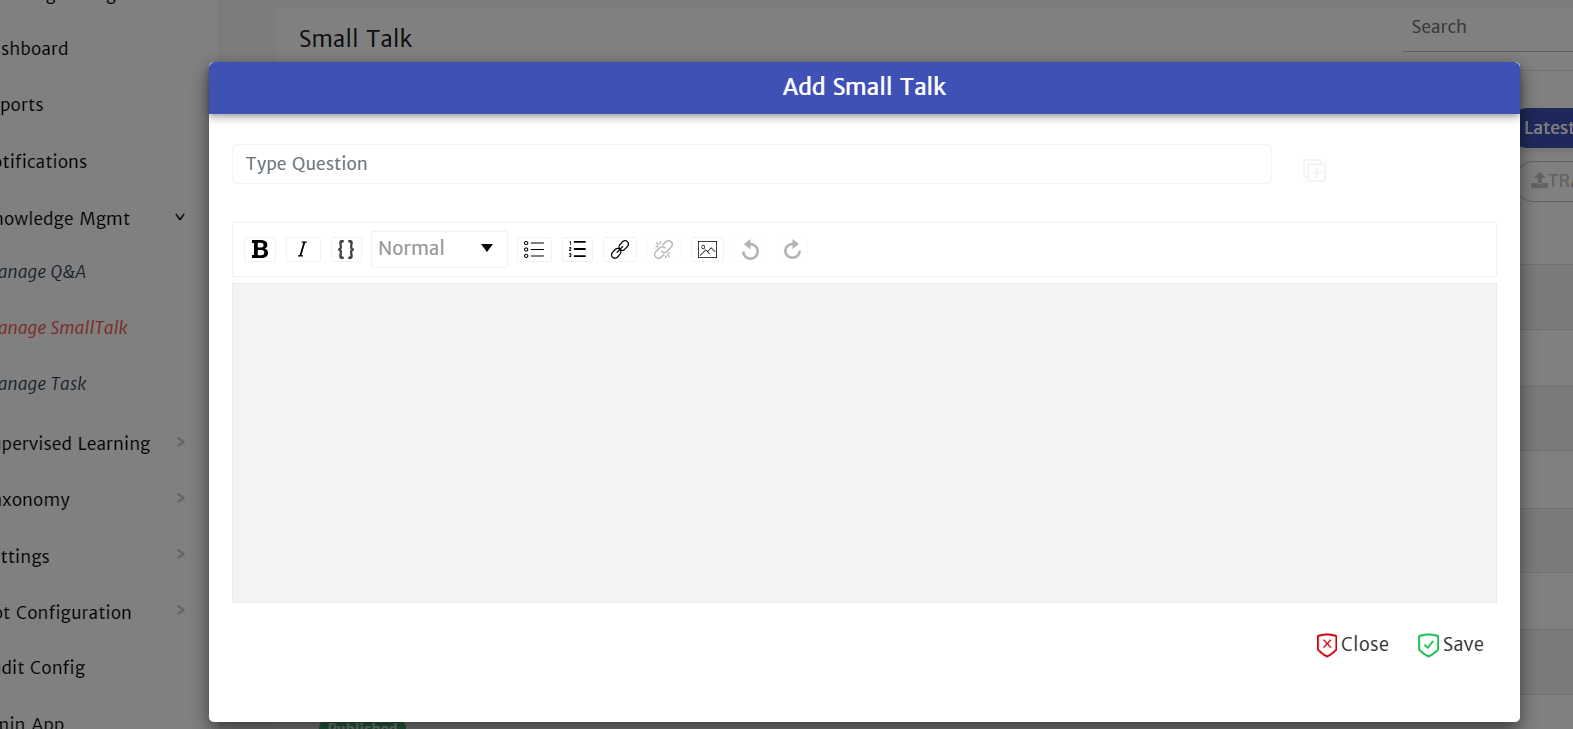
Manage SmallTalk In Manage SmallTalk, you can add, edit and delete common phrases used while doing conversation with Virtual Agent. It can be found under the Knowledge MGMT section.
Creating SmallTalk
-
Click on Knowledge Mgmt in the navigation pane on the left of your console
-
Click on Manage SmallTalk in the navigation pane on the left of your console
-
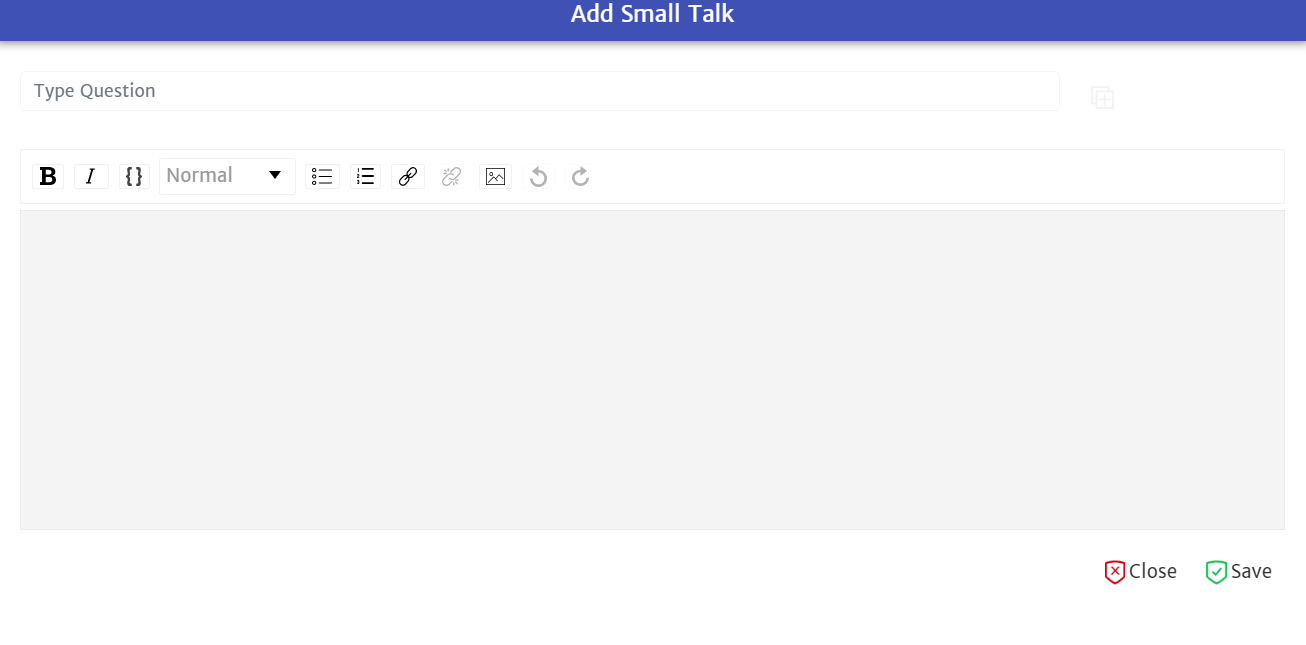
Click + next to ADD A NEW SMALL TALK
-
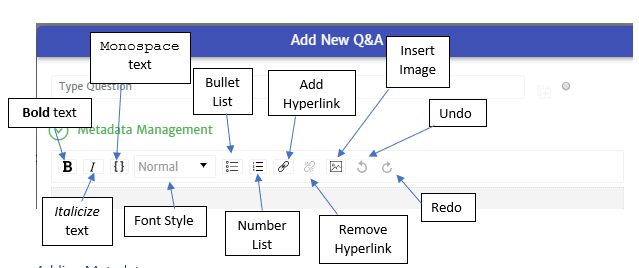
Type the phrase and response NOTES: • Small Talk has the same text editor toolbar as Manage Q&A. • Unlike other dialogues, small talk needs to be an exact match to what the user asks. You may need to add a variant. For more information, read Adding SmallTalk Variants.
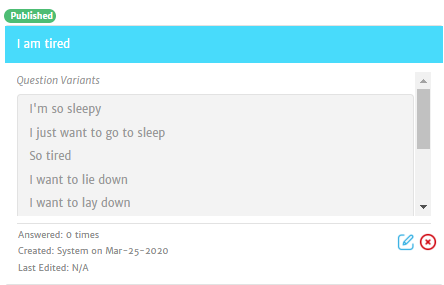
Type the common phrase here coccocommocomm on p Provide answer here 5. Click on Save Adding SmallTalk Utterances Variants There are multiple ways a user may ask the same phrase. Due to this, it is possible to create possible alternative phrases (utterance variant) related to a specific response.
- Click the icon of a box with a + next to your initial question
- Type your SmallTalk variant in the Type question box that appears
Editing SmallTalk Dialogues
-
Click on Knowledge Mgmt in the navigation pane on the left of your console
-
Click on Manage SmallTalk in the navigation pane on the left of your console
-
Find the specific phrase and response you would like to Edit (For more information, read Finding a Specific SmallTalk)
-
Click on the icon that looks like a pencil, too open the Text Editor and make changes. Deleting SmallTalk Dialogues
-
Click on Knowledge Mgmt in the navigation pane on the left of your console
-
Click on Manage SmallTalk in the navigation pane on the left of your console
-
Find the specific phrase and response you would like to Edit (For more information, read Finding a Specific SmallTalk)
-
Click on the X in a red circle Finding a Specific SmallTalk There are two ways to search/find a SmallTalk: • Using keywords or phrases • Using Filters NOTE: Filters can be used in combination with word/phrase search. Search using Keywords or Phrases
-
Click on Knowledge Mgmt in the navigation pane on the left of your console
-
Click on Manage SmallTalk in the navigation pane on the left of your console
-
In the search box type your keyword or phrase
-
Press enter or click the magnifying glass in the search box Search Using Filters There are two types of filters available: • Publish status • Latest, Most answered or Least answered
-
Select the filter you like
-
View the results NOTE: Filters can be used in combination with word/phrase search. They can be applied before or after. You simply place your filters before or after searching your keyword/phrase. For more on keyword/phrase search refer to Search using Keywords or Phrases.
Download Excel Version of Small Talk
-
Click on Knowledge Mgmt in the navigation pane on the left of your console
-
Click on Manage SmallTalk in the navigation pane on the left of your console
-
Click Download Small Talk
-
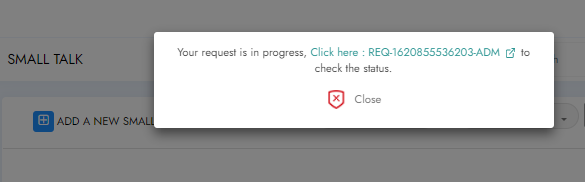
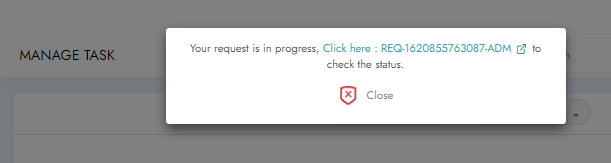
You will get a prompt, advising you your request is in progress, you can click on the link in the prompt and skip to step 6 or click Close follow the next steps
-
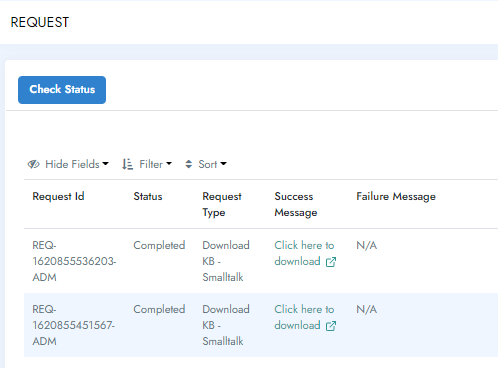
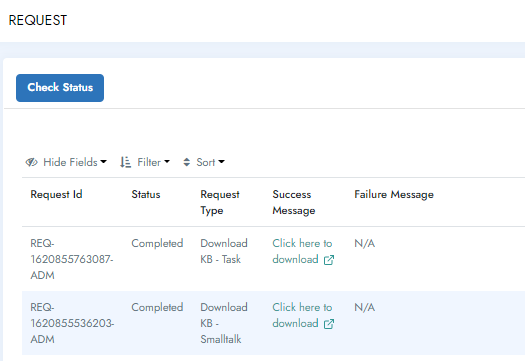
Click Request in the navigation pane on the left of your console
-
Look for your request in the list
-
If the status is Completed, under Success Message you will have a Click here to download option to click on. If the status is In Progress, click Check Status to get updated status and once Completed click on the Click here to download option.
Manage Task In Manage Task, you can add, edit and delete the utterances of complex dialogues. It can be found under the Knowledge MGMT section. You might be asking yourself what is a “task”. There are five types of tasks: • Flows with Multiple Questions o Usually to gather information and paced to someone to action o This can be a form or service catalogue type of flow • Complex Troubleshooting flow o An issue may require the user to confirm troubleshooting steps before providing an additional step o To confirm symptoms of their issue before providing the correct troubleshooting steps • Automation Task o Where the bot uses APIs to do something • Desktop Automation o Where the bot performs task/troubleshooting locally on the end user's PC • Combination of the other task
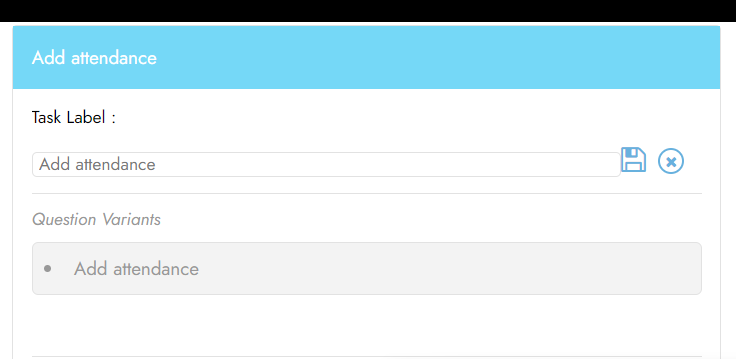
Creating a Task To create a task, you may need to build out the conversational flow and create a flowchart. Work with your CSM to determine the best method for you. Editing Task in the Admin Console Updating Label of a Task
-
Click on Knowledge Mgmt in the navigation pane on the left of your console
-
Click on Manage Task in the navigation pane on the left of your console
-
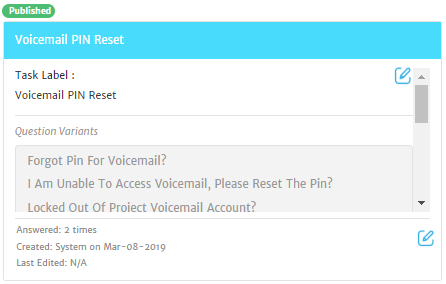
Find the specific phrase and response you would like to Edit (For more information, read Finding a Specific Complex Dialogue)
-
Click on the icon that looks like a pencil at the bottom of the box
-
Update your task label
-
Click the disk icon to save
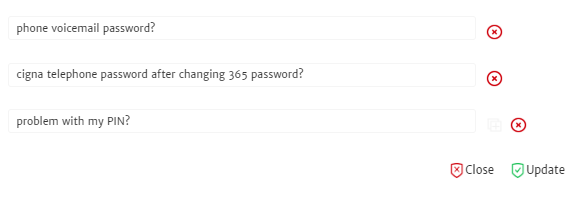
Adding Utterance Variants to a Task There are multiple ways a user may ask the same question. Due to this, it is possible to create alternative questions (utterance variant) related to a specific dialogue. 7. Click on Knowledge Mgmt in the navigation pane on the left of your console 8. Click on Manage Task in the navigation pane on the left of your console 9. Find the specific phrase and response you would like to Edit (For more information, read Finding a Specific Complex Dialogue) 10. Click on the icon that looks like a pencil at the bottom of the box 11. Click on the + icon, found next to the last utterance in the current list
-
Add your question variation
-
Click Update to save Editing a Task’s Variants
-
Click on Knowledge Mgmt in the navigation pane on the left of your console
-
Click on Manage Task in the navigation pane on the left of your console
-
Find the specific phrase and response you would like to Edit (For more information, read Finding a Specific Complex Dialogue)
-
Click on the icon that looks like a pencil at the bottom of the box
-
Find the utterance to be edited and make the required changes
-
Click Update to save Deleting a Task’s Variants
-
Click on Knowledge Mgmt in the navigation pane on the left of your console
-
Click on Manage Task in the navigation pane on the left of your console
-
Find the specific phrase and response you would like to Edit (For more information, read Finding a Specific Complex Dialogue)
-
Click on the icon that looks like a pencil.
-
Click on the X, found next to the last utterance in the current list
-
Click Update to save Finding a Specific Complex Dialogue There are two ways to search/find a SmallTalk: • Using keywords or phrases • Using Filters NOTE: Filters can be used in combination with word/phrase search. Search using Keywords or Phrases
-
Click on Knowledge Mgmt in the navigation pane on the left of your console
-
Click on Manage Task in the navigation pane on the left of your console
-
In the search box type your keyword or phrase
-
Press enter or click the magnifying glass in the search box
Search Using Filters There are two other types of filters available: • Publish status • Latest, Most answered or Least answered
- Select the filter you like
- View the results NOTE: NOTE: Filters can be used in combination with word/phrase search. They can be applied before or after. You simply place your filters before or after searching your keyword/phrase. For more on keyword/phrase search refer to Search using Keywords or Phrases.
Download Excel Version of Small Talk
-
Click on Knowledge Mgmt in the navigation pane on the left of your console
-
Click on Manage Task in the navigation pane on the left of your console
-
Click Download Task
-
You will get a prompt, advising you your request is in progress, you can click on the link in the prompt and skip to step 6 or click Close follow the next steps
-
Click Request in the navigation pane on the left of your console
-
Look for your request in the list
-
If the status is Completed, under Success Message you will have a Click here to download option to click on. If the status is In Progress, click Check Status to get updated status and once Completed click on the Click here to download option.
Reports The Reports section, provides insight into the bot. There are currently eight reports are available. • Unrecognized Utterances - All utterances for which the bot was not able to help the user. NOTE: Once the bot has been trained on an utterance it will no longer show in this report. • User Feedback- Feedback provided by users about the experience with the Bot. • Chat Sessions - All the instances created for the bot. NOTE: If the user asks multiple questions in a single chat, it is counted as one instance. • Usage Analytics - Insight about every question, whether it was helpful or not. • Ticket Details – Basic information on the tickets raised by the chatbot. Including ticket number, user id/email, team ticket assigned to, category, subcategory and status at the time of creation. • CSAT – Looks at the total number of feedbacks and the average rating by date. • Abandoned Sessions – Number of sessions left unfinished by date. • Metrics Summary – Breakdown of standard metrics such as # sessions, # tickets created, # abandoned sessions, # of tickets resolved by the bot, various CSAT-related metrics etc. Running a Report
-
Click on Reports in the navigation pane on the left of your console
-
Set the date range for the report you would like to run, From and To the desired dates
-
Click Download
-
The file will download to your PC. Locate it and click on it to open in Excel. Note: Please make sure that Pop-ups are allowed for this URL
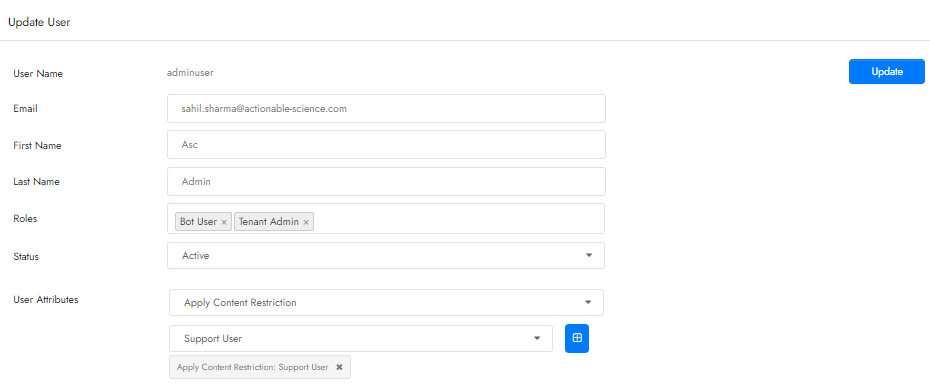
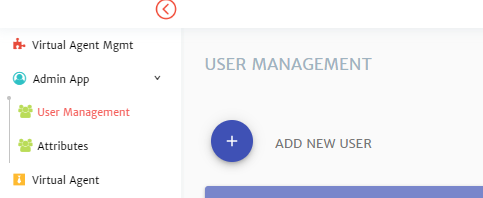
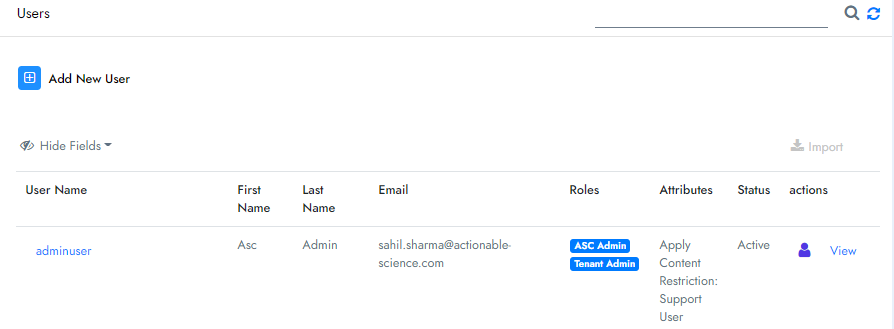
USER MANAGEMENT User Management is where users who can access the admin console are added/edited and assign appropriate roles. Virtual Agent Roles What you are able to see in the navigation pane depends on what roles you have been given in the Admin Portal. NOTE: Users are advised to logout and re-login to the system for new roles to take effect. Edit a User Account
-
Click on Admin App in the navigation pane on the left of your console
-
Click on User Management in the navigation pane on the left of your console
-
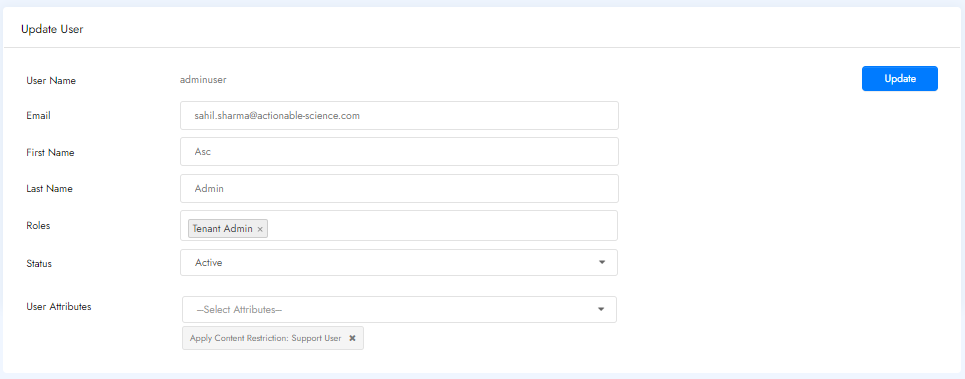
Click on the username on the same line as the user you would like to edit
-
A new page will open and you can edit
• First Name • Last Name • Email • Roles • Attributes Important Note: Please only change Roles and Attributes if you have enabled Active Directory. All other information is provided by the account info associated with your AD. NOTE: When adding and removing a Role, click outside of the Roles box for it to minimize. 5. When changes are complete, click on the Update to Save Activate and Deactivate an Account Accounts can be deactivated and re-activated with a simple click.
-
Click on Admin App in the navigation pane on the left of your console
-
Click on User Management in the navigation pane on the left of your console
-
Click on the username on the same line as the user you would like to edit
-
Go to the Status field
-
Click on the current Status selection box
-
Choose the status you would like it to be
-
Click Update to save your changes