Knowledge Integrations
Knowledge Integrations enables organizations to connect external knowledge repositories to the Rezolve AI platform. This feature allows seamless synchronization of knowledge content from third-party applications directly into the Rezolve Knowledge Base, making it accessible to the Virtual Agent for intelligent responses and to agents for quick reference.
Key Capabilities
- Centralized Knowledge: Aggregate knowledge from multiple external sources into a single, searchable knowledge base
- Automated Synchronization: Schedule automatic sync intervals to keep knowledge content up-to-date
- Audience-Based Access Control: Define which user groups can access specific knowledge content
- Incremental Sync: Only sync new or modified content to optimize performance
- Permission Inheritance: For SharePoint integrations, inherit source permissions to maintain security boundaries
- OCR Support: Enable Optical Character Recognition for processing image-based documents
How It Works
- Connect: Establish a secure connection to your external knowledge source using appropriate credentials
- Select Content: Choose specific content sets (sites, folders, knowledge bases, spaces) to sync. Optionally add audience-based access control
- Configure Sync: Set up sync schedules and notification preferences
- Monitor: Track sync status, view reports, and manage any failed files
Supported Applications
Knowledge Integrations currently supports the following applications:
| Application | Content Types | Special Features |
|---|---|---|
| SharePoint | Drives, Site Pages, Sub-sites, Folders | Permission inheritance from SharePoint |
| ServiceNow | Knowledge Base articles and folders | KB folder selection |
| Confluence | Spaces and pages | Space-level content selection |
Accessing Knowledge Integrations
Navigation Path
- Log in to the Rezolve AI Console
- Navigate to the Knowledge Management menu in the left navigation panel
- Locate the Knowledge Integrations section
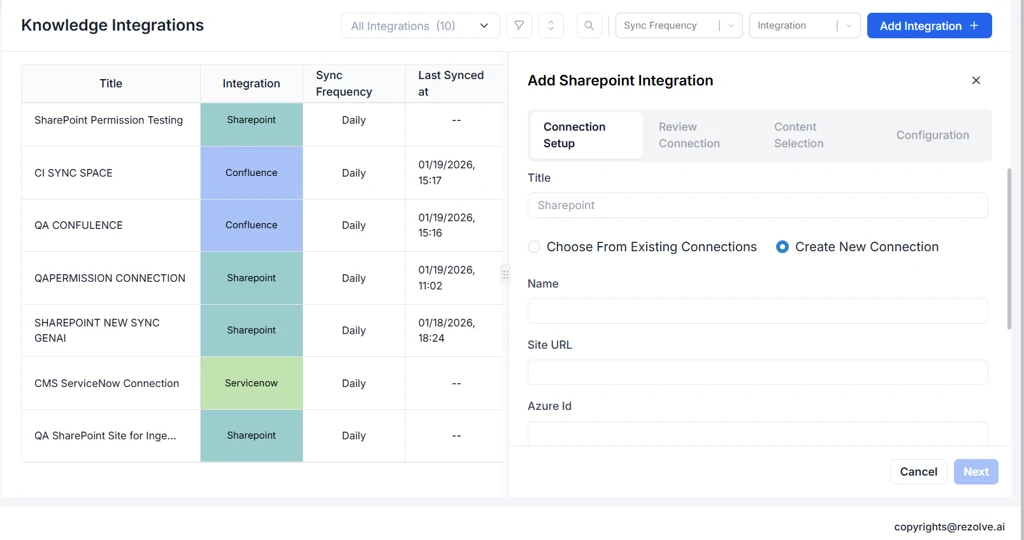
Setting Up a New Knowledge Integration
Creating a new Knowledge Integration follows a three-step workflow: Connection Setup, Content Selection, and Configuration.
Initiating the Setup
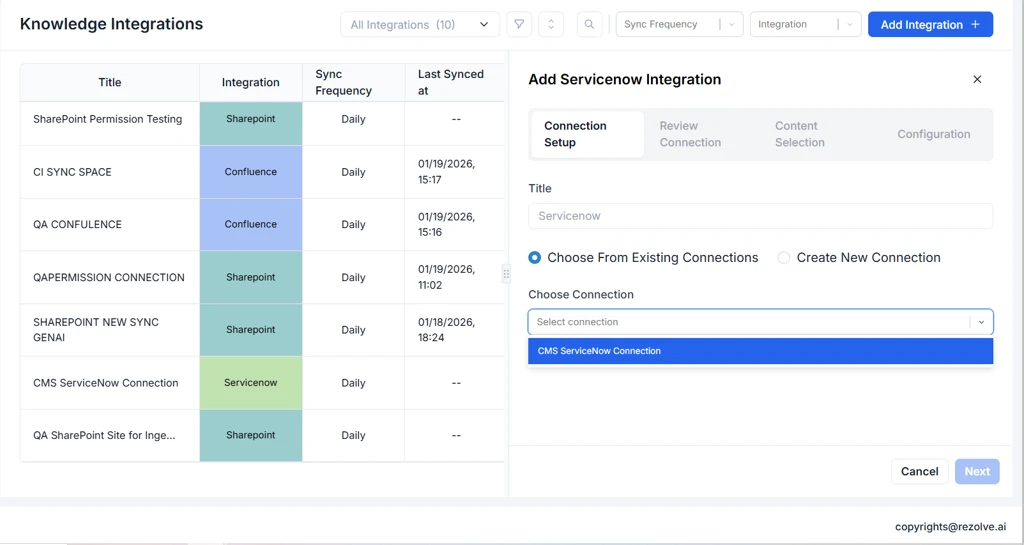
- Click the Add Integrations button
- From the dropdown submenu, select the application you want to integrate (SharePoint, ServiceNow, or Confluence)
- The integration wizard opens with Step 1: Connection Setup
SharePoint Integration
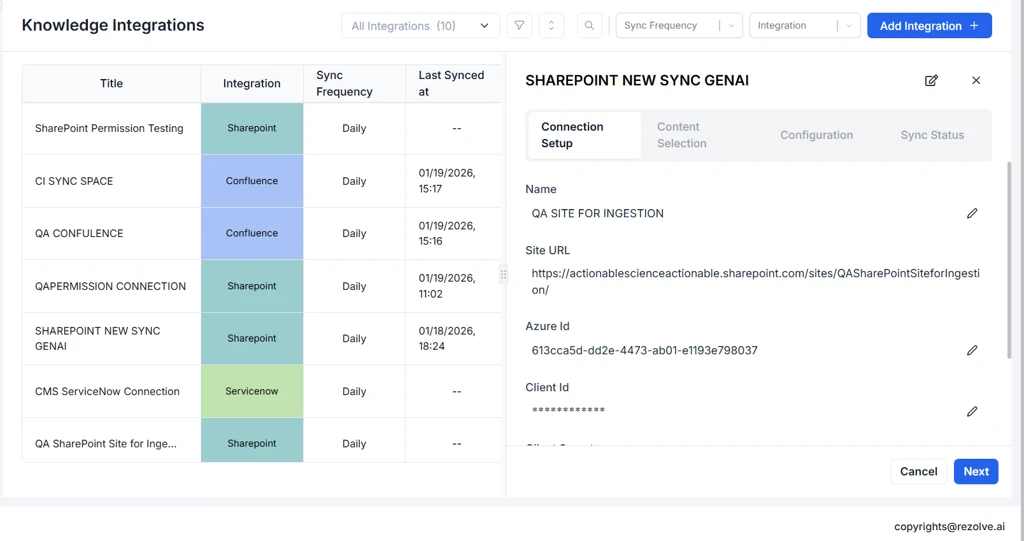
Step 1: Connection Setup
The Connection Setup screen allows you to establish a secure connection to your SharePoint environment.
Using an Existing Connection:
- Click the Connection dropdown field
- Select a previously configured SharePoint connection from the list
- Click Next to proceed to Content Selection
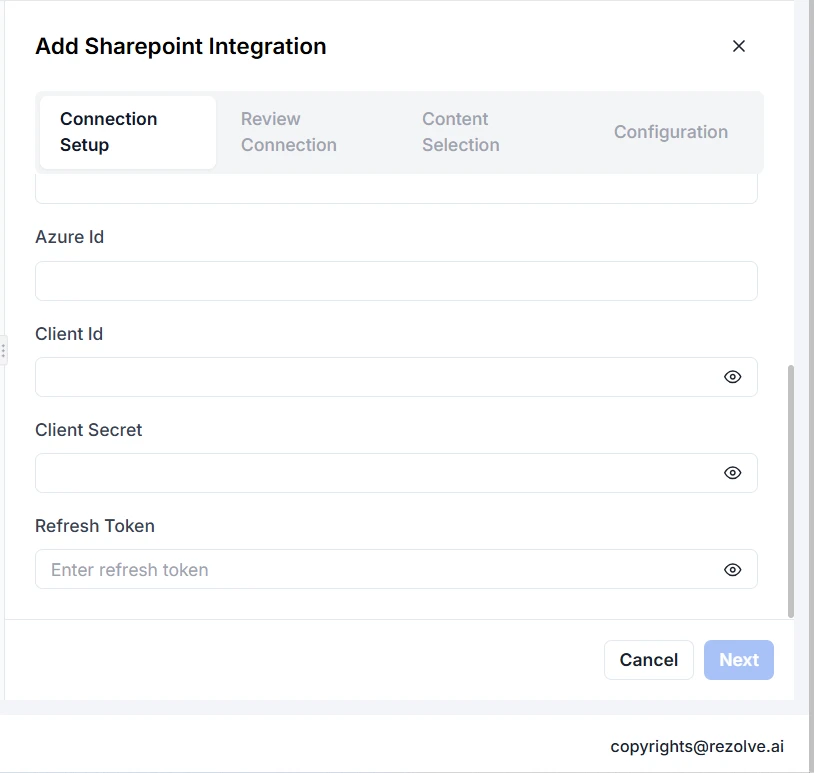
Creating a New Connection:
- Click the + Create New Connection option
- Fill in the required connection details:
- Connection Name: A descriptive name for this connection
- Azure Tenant ID: Your Microsoft Azure tenant identifier
- Client ID: The application (client) ID from Azure AD app registration
- Client Secret: The client secret value from Azure AD
- Click Save to create the connection
- The new connection is automatically selected
- Click Next to proceed

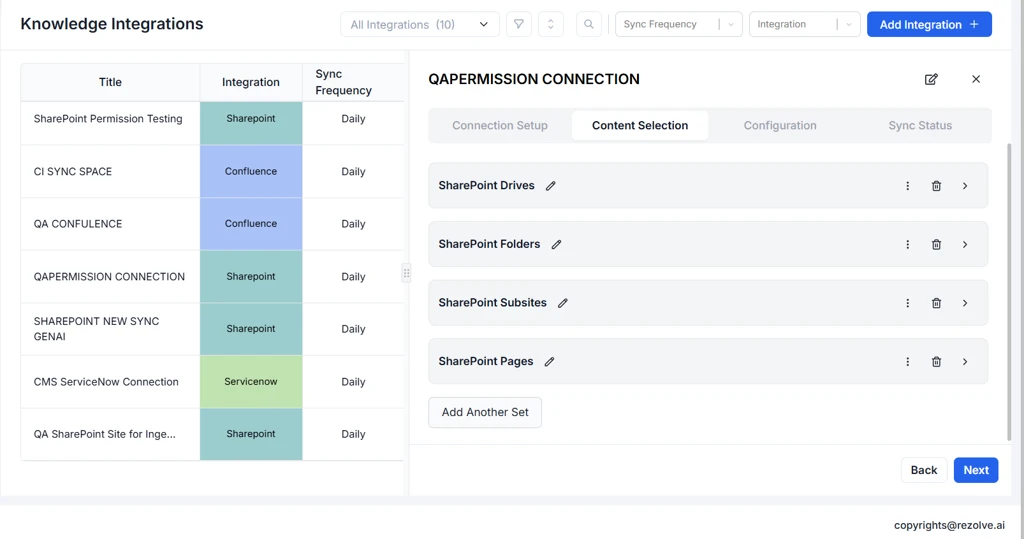
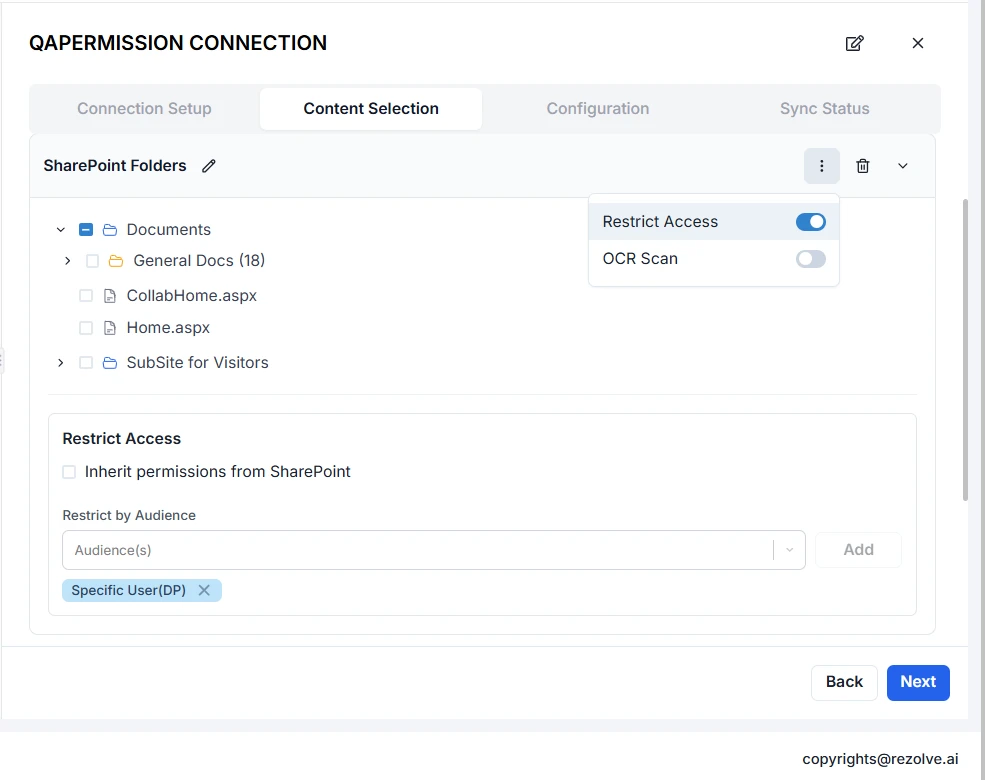
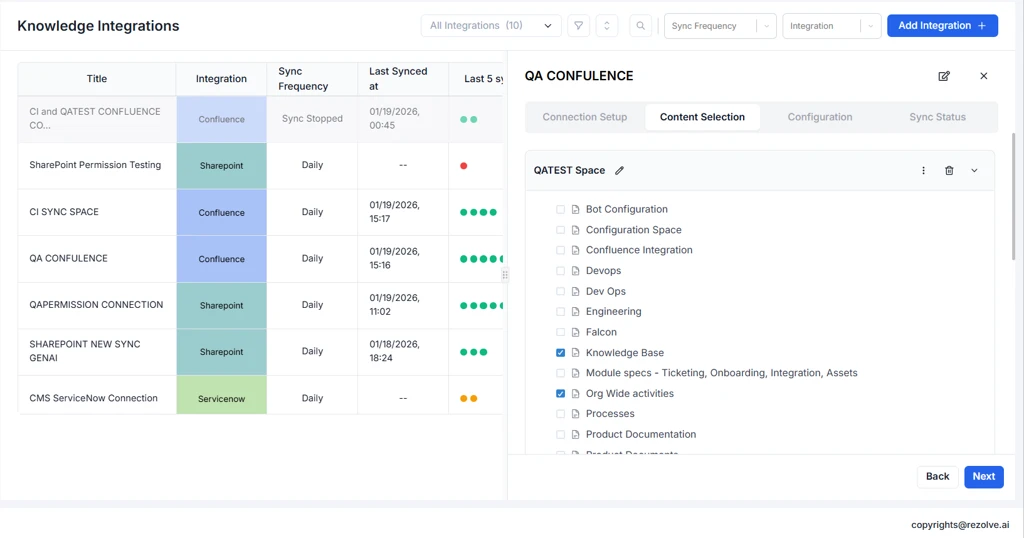
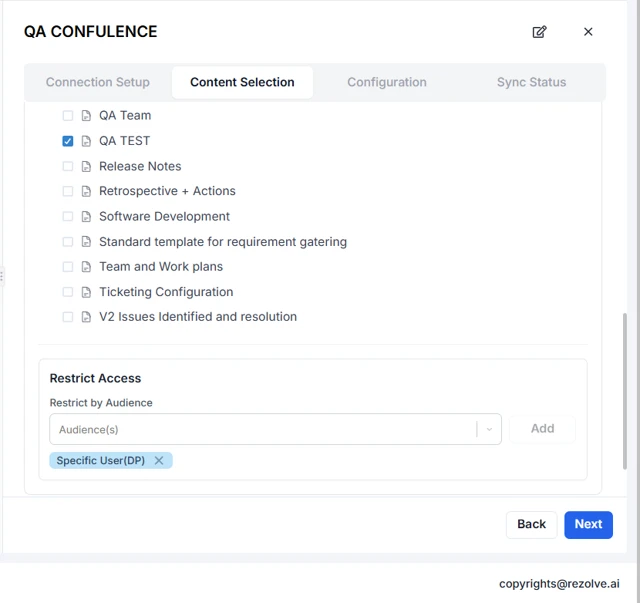
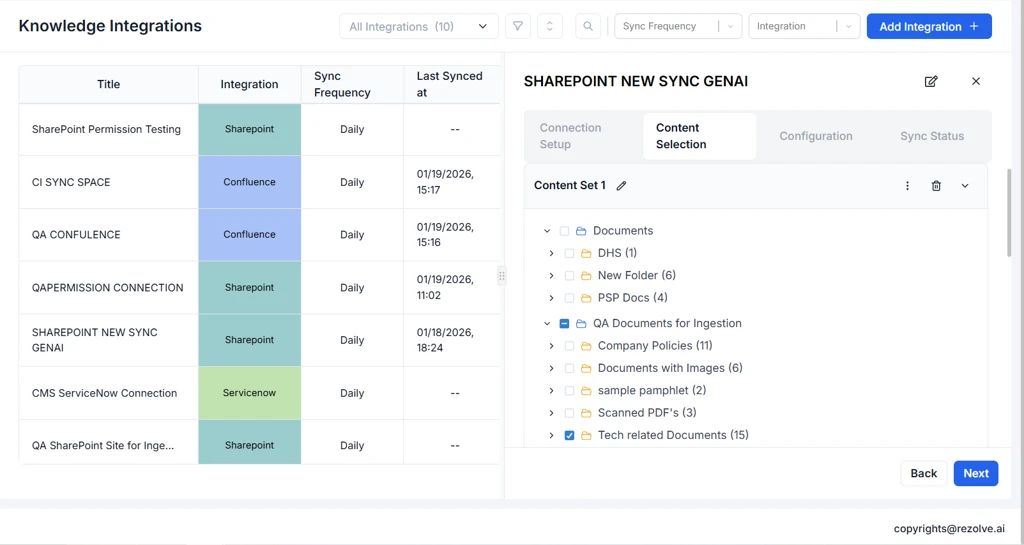
Step 2: Content Selection
Configure which SharePoint content to sync and define audience access.
Adding Content Sets:
A content set is a collection of SharePoint locations combined with audience restrictions. You can create multiple content sets within a single integration.
-
Click + Add Content Set to create a new content set
-
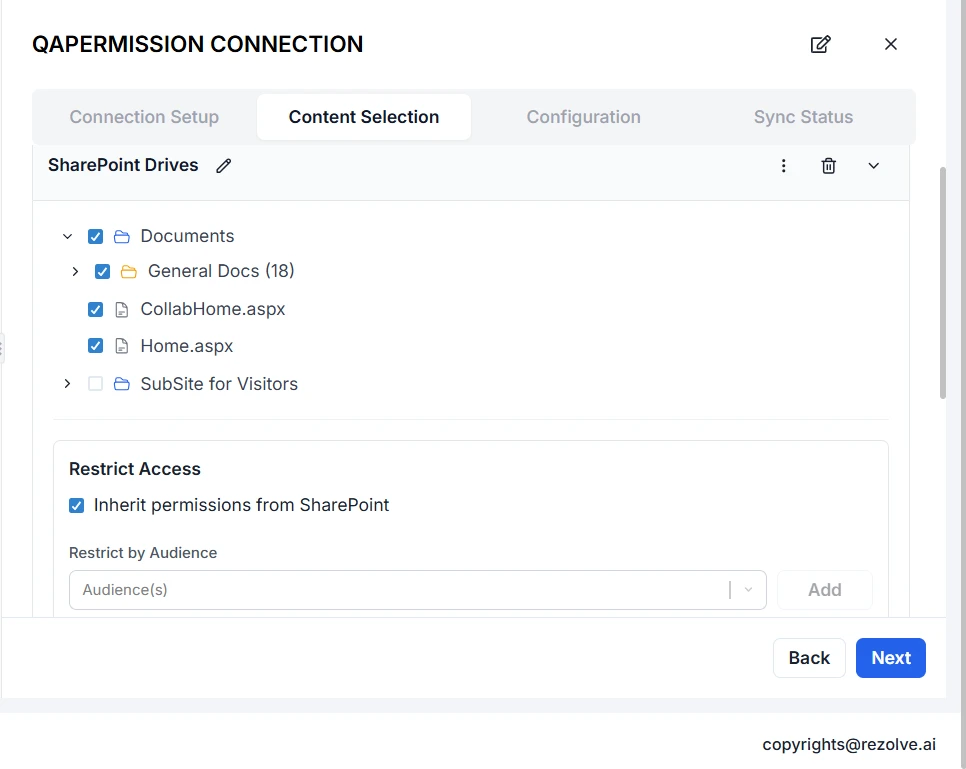
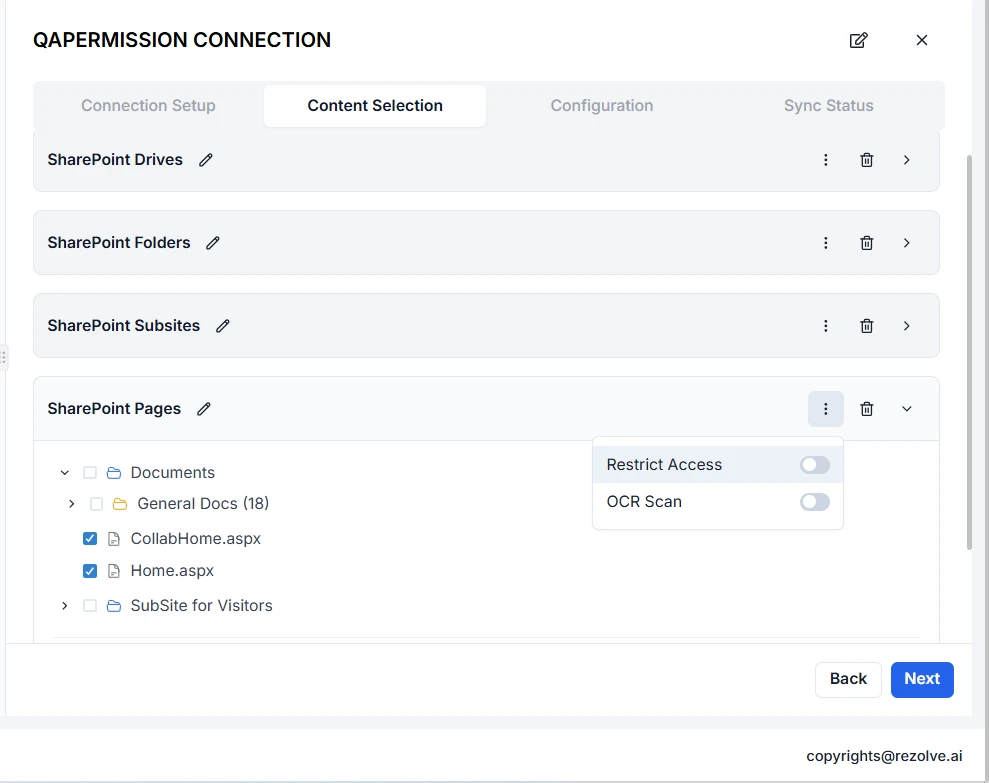
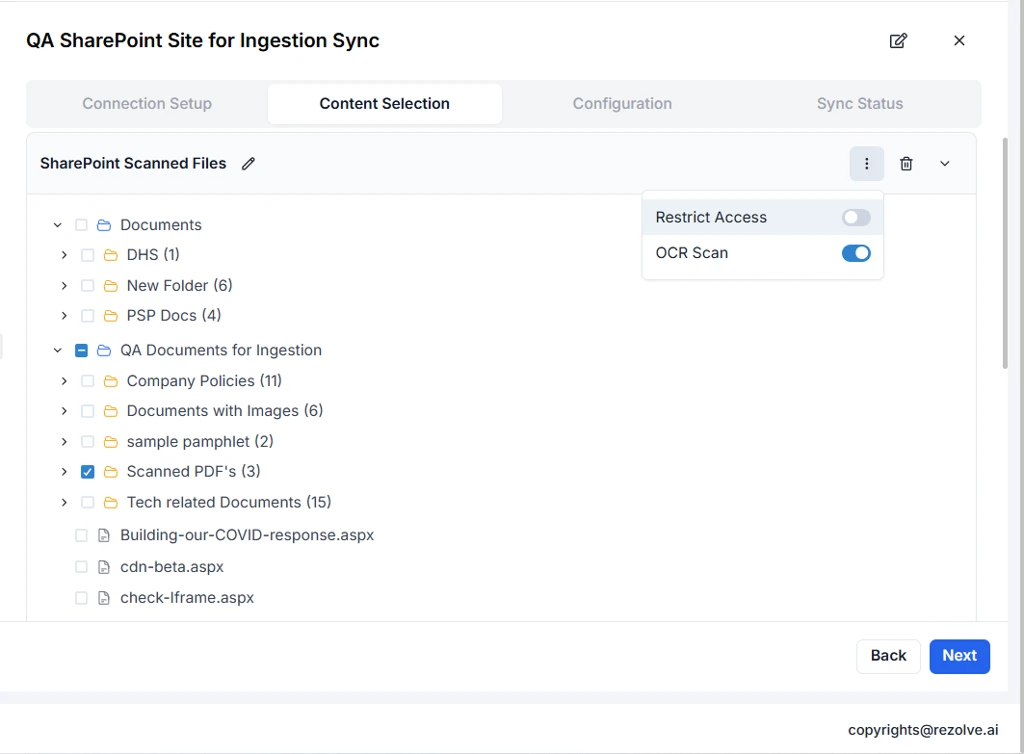
For each content set, configure:
Content Sources (select one or more):
- Drives: Select specific document libraries
- Site Pages: Choose site pages to include
- Sub-sites: Select sub-sites within your SharePoint hierarchy
- Folders: Pick specific folders from document libraries
-
Audience Configuration:
- Click the Audience field
- Select user groups who should have access to this content
- Multiple audiences can be selected per content set
-
Inherit Permissions from SharePoint (SharePoint-specific):
- Enable this checkbox to automatically inherit access permissions from SharePoint
- When enabled, users will only see content they have permission to view in SharePoint
- This option is only available for SharePoint integrations
-
OCR Scan Enabled (optional):
- Enable this option to process image-based documents using Optical Character Recognition
-
Repeat steps 1-5 to add additional content sets as needed
-
Click Next to proceed to Configuration
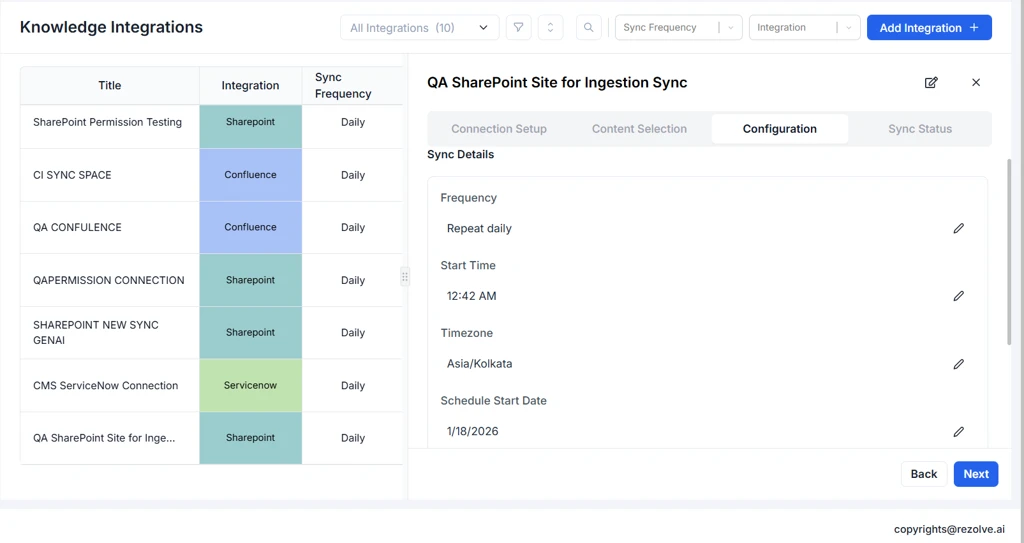
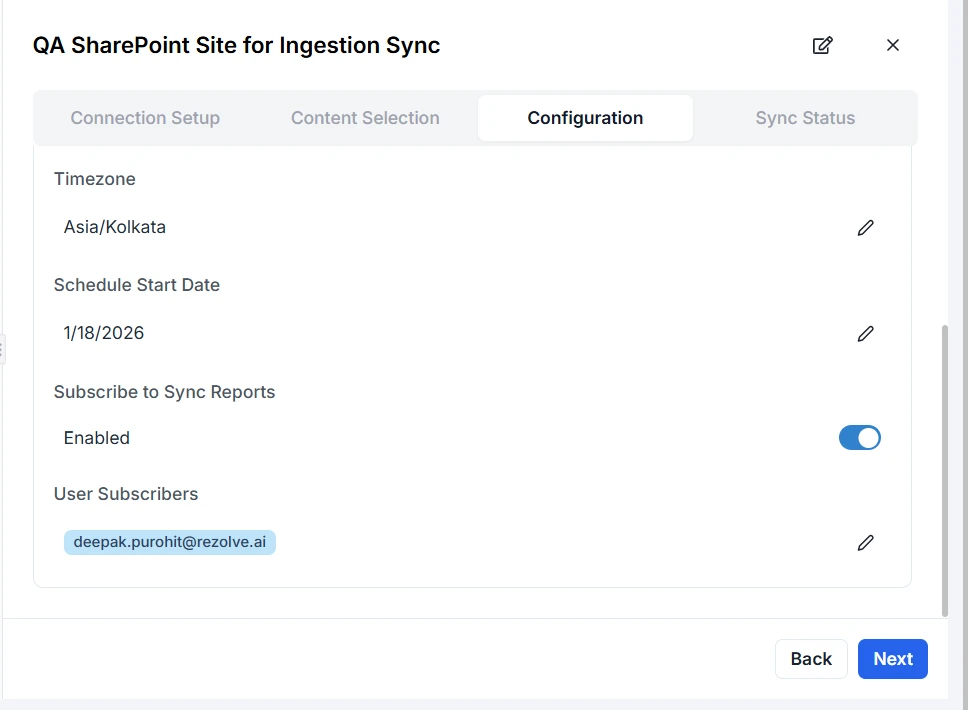
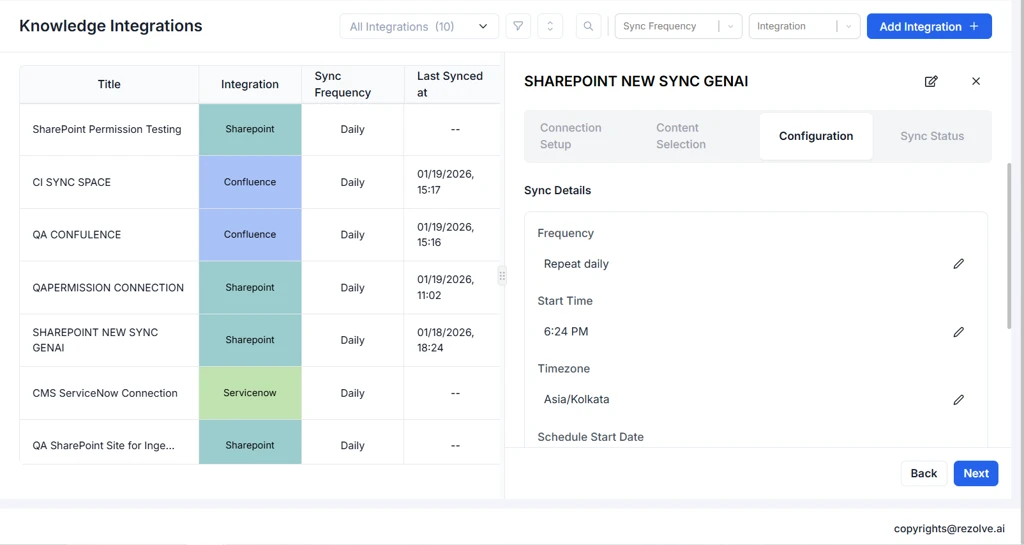
Step 3: Configuration
Set up the sync schedule and notification preferences.
Sync Schedule:
-
Sync Frequency: Select from available options:
- Daily
- Weekly
- Custom interval
-
Schedule Start Date: Choose when the sync schedule should begin
-
Start Time: Set the time of day for sync to run
Email Notifications:
- Enable Subscription: Toggle on to enable email notifications
- Subscribers: Add email addresses of users who should receive sync status notifications
Click Save to create the integration. The system will display the integration in the list view with sync status information.
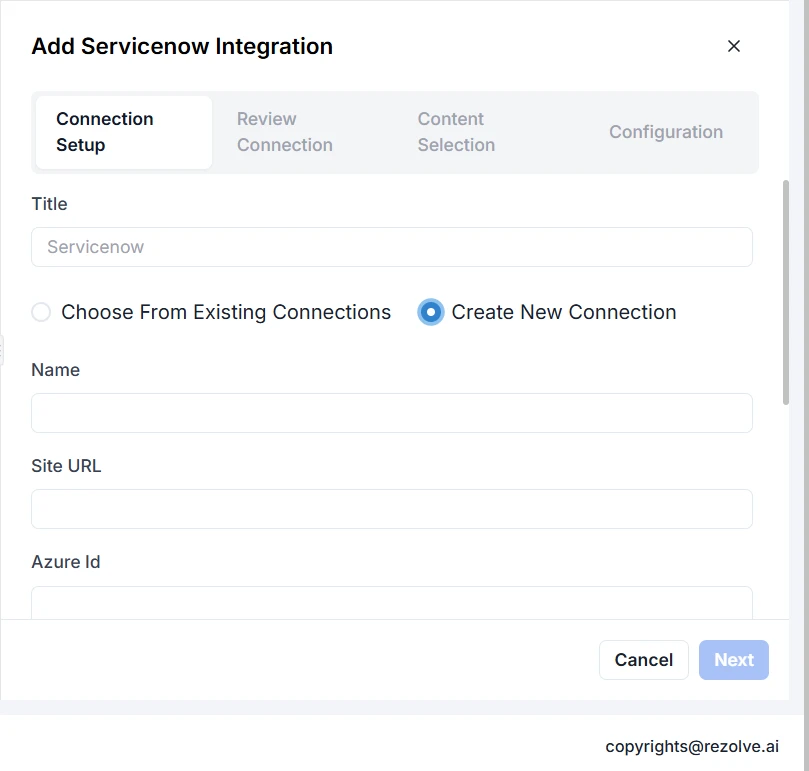
ServiceNow Integration
Step 1: Connection Setup
Using an Existing Connection:
- Click the Connection dropdown field
- Select a previously configured ServiceNow connection
- Click Next to proceed
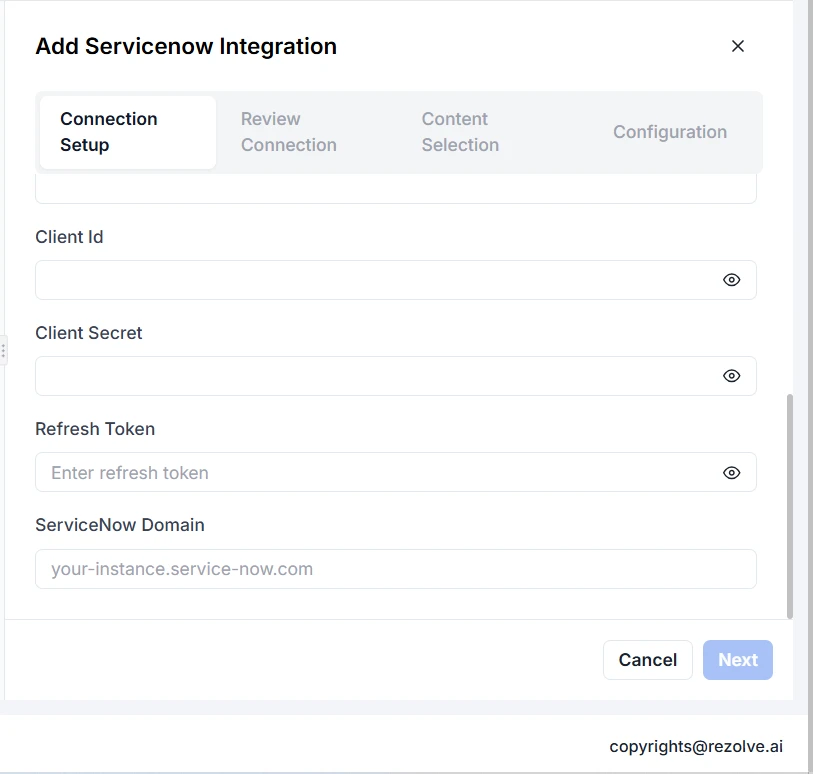
Creating a New Connection:
- Click + Create New Connection
- Fill in the required details:
- Connection Name: A descriptive name
- ServiceNow Domain: Your ServiceNow instance URL (e.g.,
yourcompany.service-now.com) - Username: ServiceNow username with API access
- Password: ServiceNow password
- Client ID: OAuth client ID (if using OAuth)
- Client Secret: OAuth client secret (if using OAuth)
- Refresh Token: OAuth refresh token (if applicable)
- Click Save to create the connection
- Click Next to proceed


Step 2: Content Selection
Same as SharePoint content selection - see above.
Note: The "Inherit permissions from SharePoint" option is not available for ServiceNow integrations.
Step 3: Configuration
Configure sync schedule and notifications (same as SharePoint - see above).
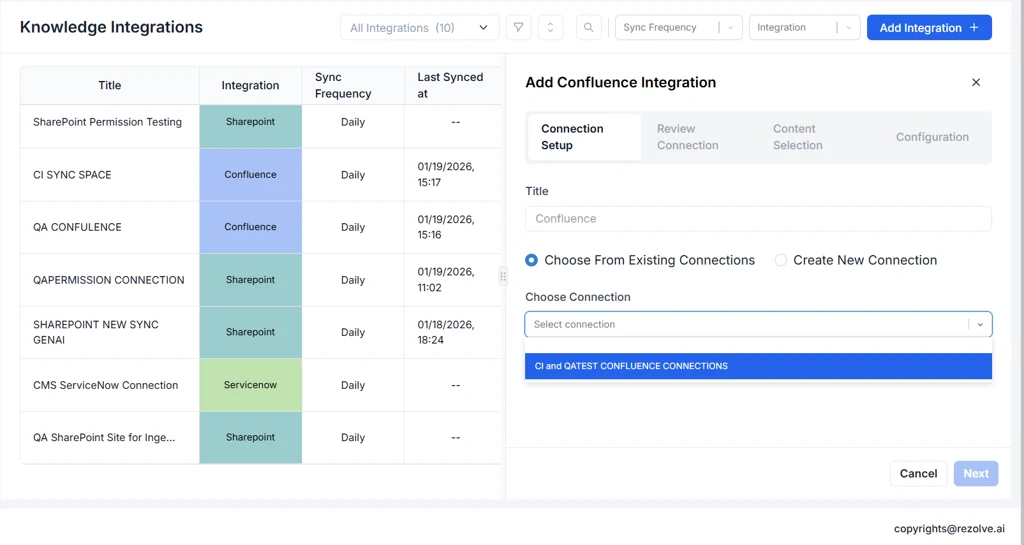
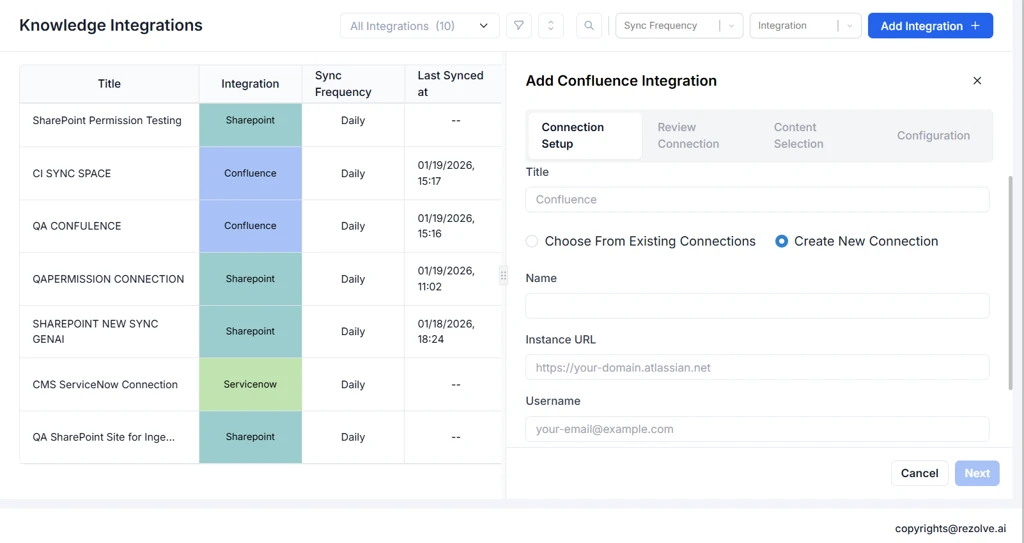
Confluence Integration
Step 1: Connection Setup
Using an Existing Connection:
- Select a previously configured Confluence connection from the dropdown
- Click Next to proceed
Creating a New Connection:
- Click + Create New Connection
- Fill in the required details:
- Connection Name: A descriptive name
- Site URL: Your Confluence instance URL (e.g.,
https://yourcompany.atlassian.net/wiki) - Username: Confluence username (typically your email)
- API Token: Atlassian API token (generated from Atlassian account settings)
- Click Save to create the connection
- Click Next to proceed

Step 2: Content Selection
Same as SharePoint content selection - see above.
Note: The "Inherit permissions from SharePoint" option is not available for Confluence integrations.
Step 3: Configuration
Configure sync schedule and notifications (same as SharePoint - see above).
Managing Knowledge Integrations
Viewing Integration Details
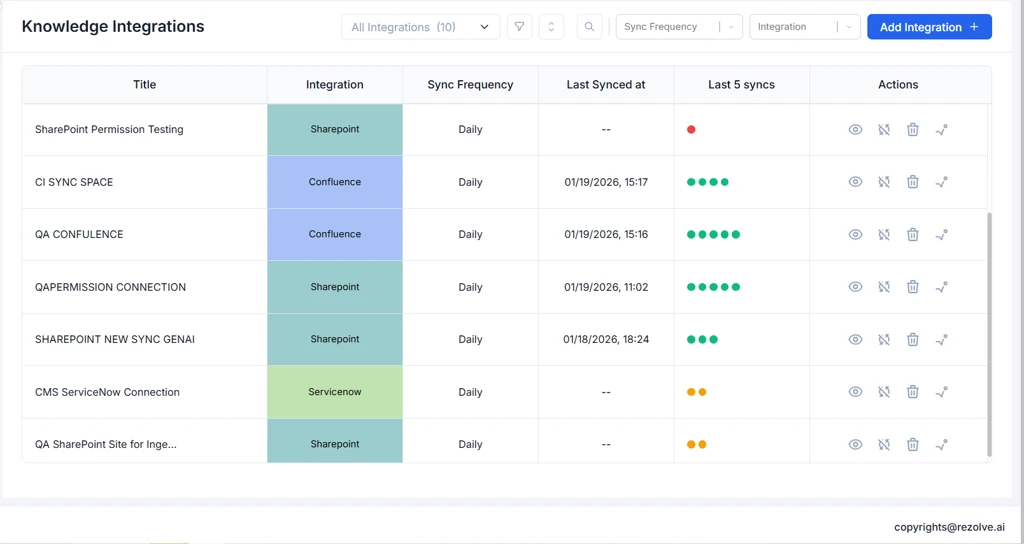
After creating an integration, it appears in the Knowledge Integrations list view.
List View Columns:
- Title: Integration name
- Application: Source application (SharePoint, ServiceNow, or Confluence)
- Connection: Associated connection name
- Last Synced: Timestamp of the most recent sync
- Status: Current sync status
- Actions: Edit, Stop Sync, Delete, View Bounced Files
Accessing Detailed View:
- Click the View icon in the Actions column
- The detail view opens with the Sync Status tab selected by default
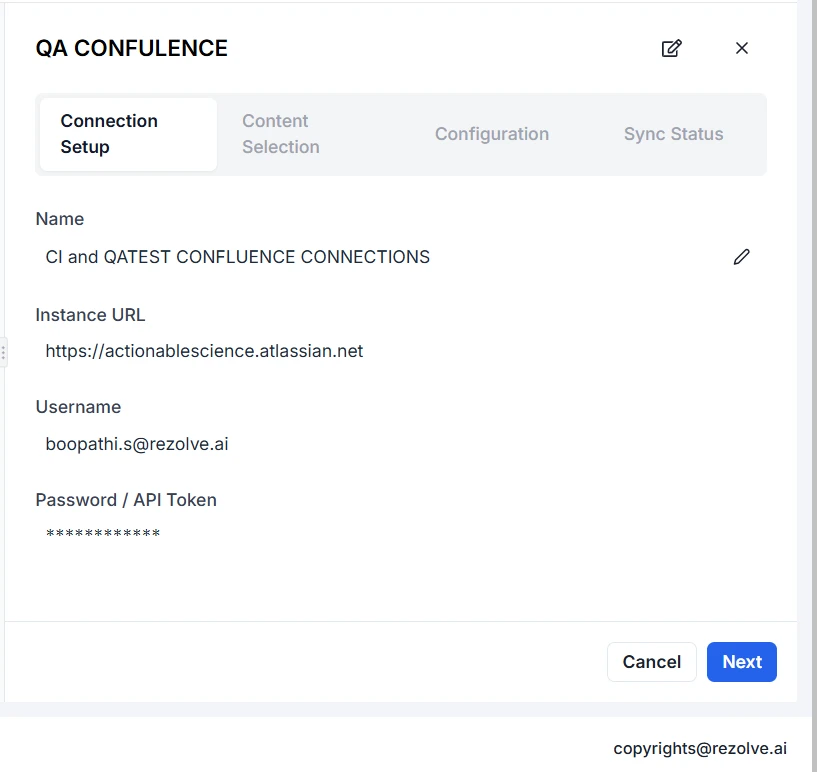
Editing an Integration
You can modify an existing integration's settings at any time.
To Edit an Integration:
- From the list view, locate the integration you want to modify
- Click the View icon (eye icon) in the Actions column
- The system opens the sync configuration details with current settings pre-populated
Editable Settings:
- Step 1 - Connection Setup: Change the connection (cannot create new while editing). The site URLs can not be edited post the first sync.
- Step 2 - Content Selection:
- Add or remove content sets
- Modify selected drives, sites, folders, KB folders, or spaces
- Update audience assignments
- Enable/disable permission inheritance (SharePoint only)
- Toggle OCR scanning
- Step 3 - Configuration:
- Modify sync frequency and schedule
- Add or remove email subscribers
- Click Save to apply changes
Note: Changes to content selection will take effect on the next scheduled sync or when a manual sync is triggered.
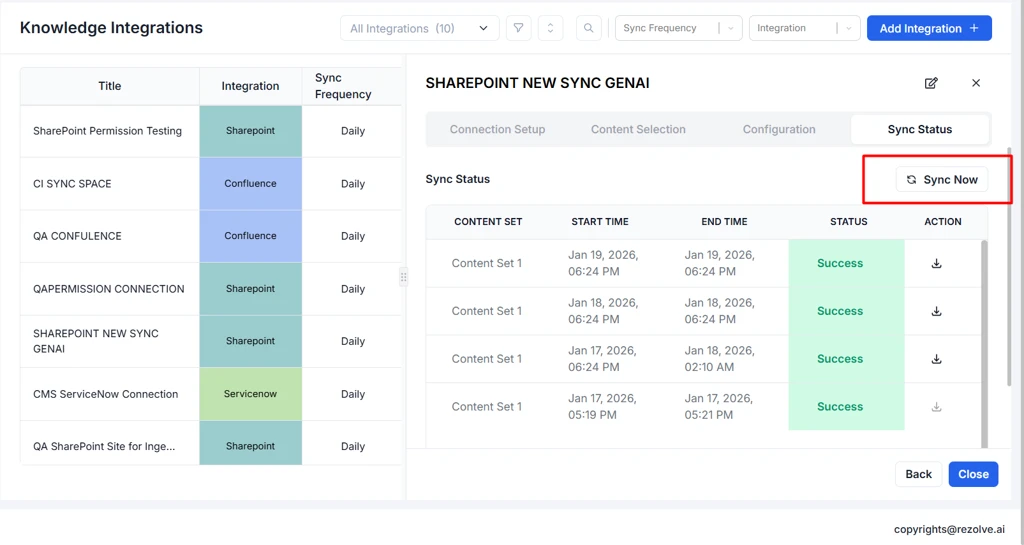
Triggering Manual Sync (Sync Now)
In addition to scheduled syncs, you can manually trigger a sync at any time.
To Trigger Manual Sync:
- Open the integration detail view by double-clicking the integration
- Navigate to the Sync Status tab
- Click the Sync Now button
- The sync process begins immediately
- Monitor progress in the Sync Status section
Use Cases for Manual Sync:
- Immediately sync newly added content
- Re-sync after resolving bounced files
- Verify sync configuration after making changes
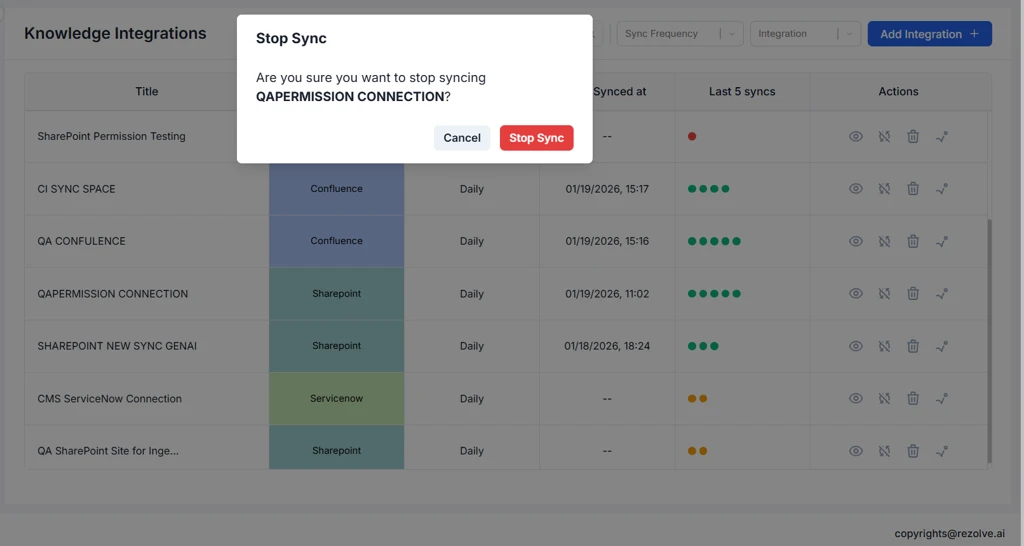
Stopping a Sync
You can disable future scheduled syncs -
-
From the list view, click the Stop Sync icon in the Actions column, or
-
Open the detail view and click Stop Sync
-
A confirmation dialog appears with the following message:
"Are you sure you want to stop this sync? While this sync won't be active anymore, the knowledge previously ingested won't be removed from Rezolve Knowledge Base."
-
Click Confirm to stop the sync
Important Notes:
- Stopping a sync does not remove previously ingested knowledge from the Rezolve Knowledge Base
- The integration configuration is preserved
- You can resume syncing by triggering a manual sync or re-enabling the schedule
Deleting an Integration
Deleting an integration permanently removes both the sync configuration and all associated ingested knowledge.
To Delete an Integration:
-
From the list view, click the Delete icon (trash icon) in the Actions column
-
A confirmation dialog appears with a warning message:
"This action would remove all the ingested knowledge for this sync configuration from Rezolve knowledge base. Type "Delete Knowledge" below to confirm delete."
-
Type "Delete Knowledge" in the input field and click Delete to confirm, or Cancel to abort
Important Considerations:
- Permanent Action: Deletion cannot be undone
- Knowledge Removal: All articles and content from this integration will be removed from the Rezolve Knowledge Base
- Impact on Virtual Agent: The Virtual Agent will no longer have access to this knowledge for answering queries
- Bounced Files: Any bounced files associated with this integration will also be deleted

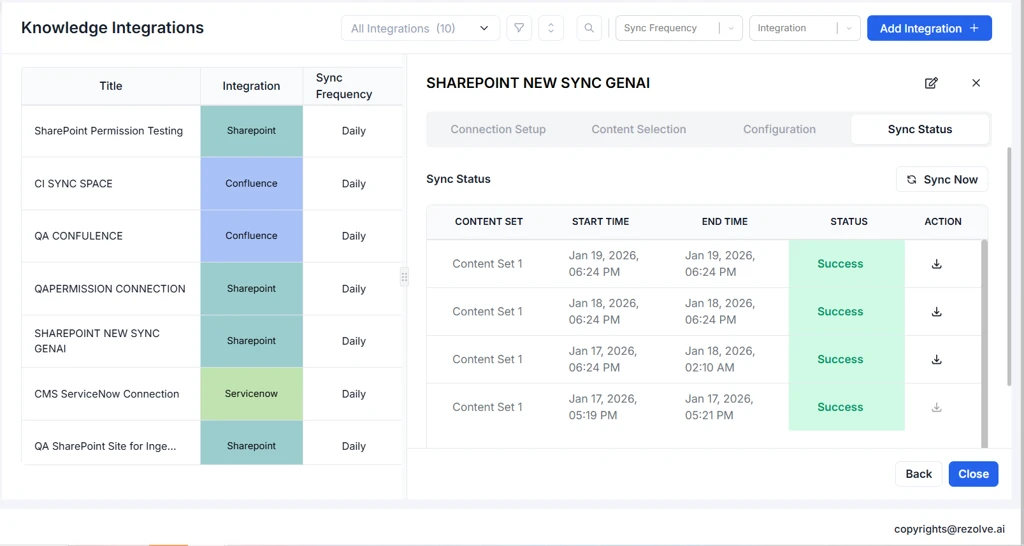
Sync Status and Monitoring
Viewing Sync Status
The Sync Status tab provides comprehensive information about sync operations.
Accessing Sync Status:
- Double-click an integration from the list view
- The detail view opens with Sync Status as the default tab with following information
| Column | Description |
|---|---|
| Content Set | Name of the content set |
| Start Time | When the sync began |
| End Time | When the sync completed |
| Status | Outcome (Success, Failed, Stopped) |
| Action/s | Link to download sync log |
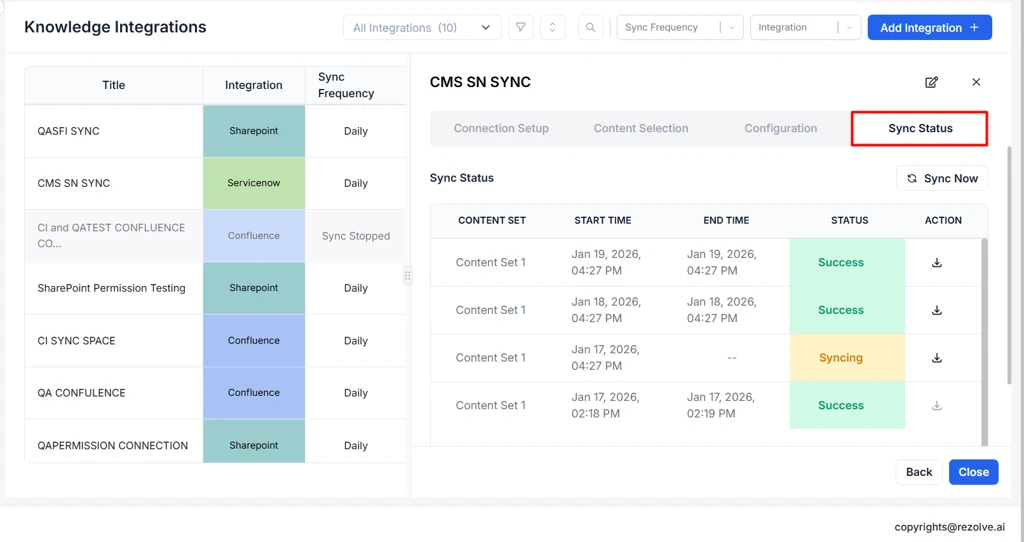
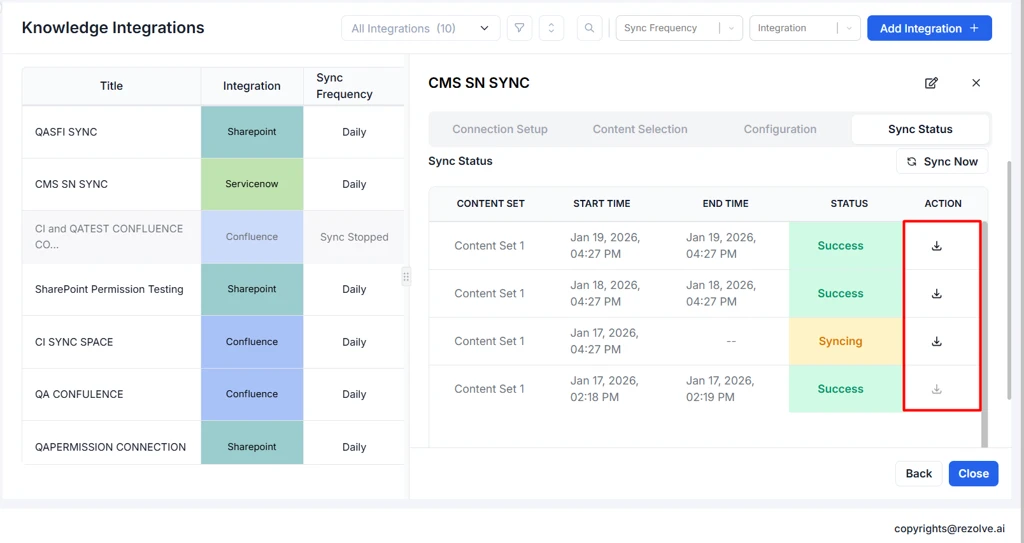
Downloading Sync Logs
Sync logs provide detailed information about each sync operation for troubleshooting and auditing.
To Download Sync Logs:
- Navigate to the Sync Status tab of the integration
- In the Sync History table, locate the sync job you want to review
- Click the Download icon in the row's action column
- The log file downloads in CSV format
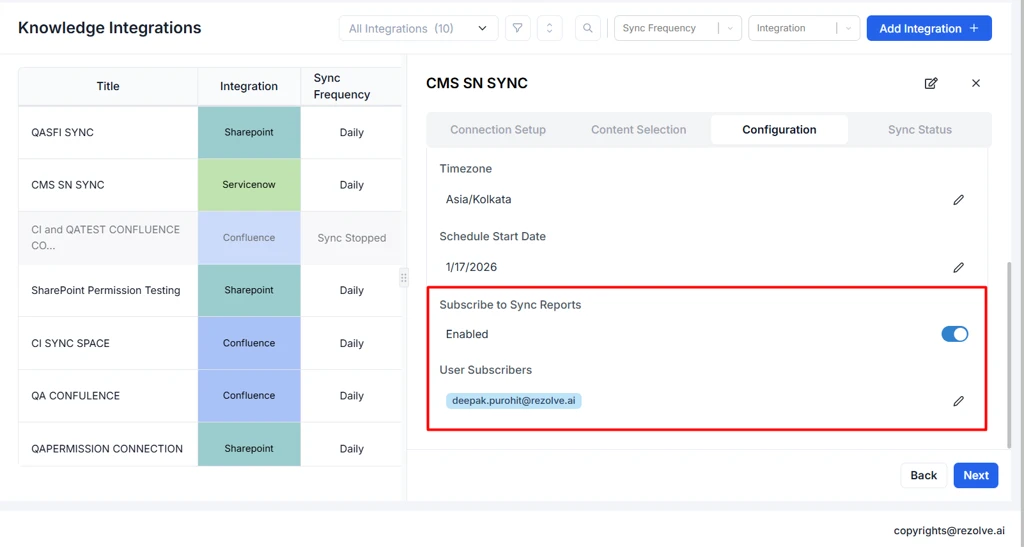
Email Notifications
Stay informed about sync status through email notifications.
Configuring Email Notifications:
- During integration setup (Step 3: Configuration), or
- Edit an existing integration and navigate to Step 3
Configuration Options:
- Enable Subscription: Toggle to enable/disable email notifications
- Subscribers: Add email addresses of team members who should receive notifications
Notification Contents:
- Sync status (Success, Failed, Partial)
- Link to view sync status CSV file
Notification Triggers:
- Sync completion (success)
- Sync failure
Managing Bounced Files
Bounced files are documents that failed to process during sync. Managing these files ensures complete knowledge coverage.
Viewing Bounced Files
Accessing Bounced Files:
- From the list view, click the Bounce icon (warning/exclamation icon) in the Actions column for the relevant integration
- The Bounced Files panel opens, displaying all failed files
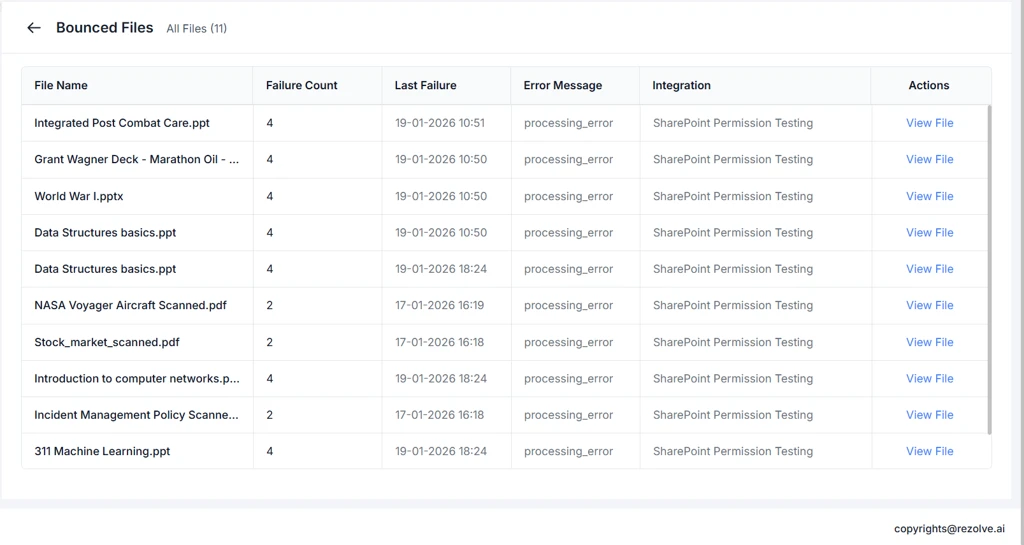
Resolving Bounced Files
View File:
- Click the View File button next to the bounced file
- The system opens the file in the source application (SharePoint, ServiceNow, or Confluence)
- Review and fix the issue in the source system
- During the next sync, the system will attempt to process the file again
Appendix
Supported File Types
Knowledge Integrations can process the following file types:
| Category | Extensions |
|---|---|
| Documents | .pdf, .doc, .docx, .txt, .rtf |
| Spreadsheets | .xls, .xlsx |
| Presentations | .ppt, .pptx |
| Web Content | .html, .htm |
| Files with OCR | .pdf, .doc, .docx, .png, .jpg, .jpeg, .gif, .bmp |
Permission Requirements
SharePoint
- Azure AD App Registration with:
- Sites.Read.All
- Sites.FullControl.All
ServiceNow
- User account with:
- Knowledge Base read access
- API access enabled
Confluence
- User account with:
- Read access to selected spaces
- API token authentication
For additional support, contact your Rezolve AI administrator or raise a support ticket.